Blog Keywords

Popular Posts for the Month

Friday, January 30, 2009

Zuiko and Panorama Panning

I was playing with the Autostitch software, when the idea of doing a panorama of a continuous panning shots caught me.

Simply put, a sequence of 8 images of a go-kart moving along the track.

Please click the image to see the full 8-kart sequence.

The whole sequence was originally 12 shots, but the last 4 shots could not be stitched because of the gaps that were too big. Alas, the E-30 could only conjure up to 5 frames-per-second sequence. A fast D-SLR such as the Canon 1D mark 3 should be able to cope with its 10 frames-per-second speed.
Below is the original stitched image. It shows the panning line.

What I like from this image is that it shows dynamism of the sport. I will have to find other sports or events that can give similar effect some other time.

Boy, it's so cool!!

Wednesday, January 28, 2009

Zuiko and Badminton's World No.1


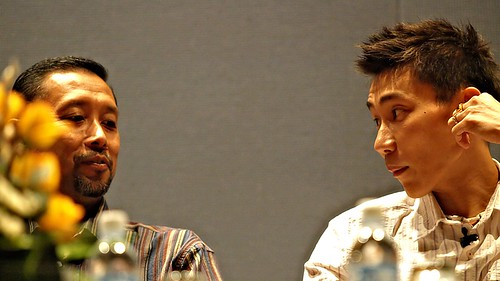
It was a treat to have both top badminton players, one who is at the peak of his prime and another who was a legend and now the coach, to come for an inspired chat at Maxis.
Datuk Lee Chong Wei and Misbun Sidek were greeted with loud applause by the audience, and were quick to adapt to the maniacally interested crowd. Attendance was packed to the brim, which was only mirrored by the Astronaut a few months back. Well, it was not often you can meet up close with Badminton's No.1!

There were two emcees for the evening, and both did a great job to enliven the high spirits of the audience. It was electrifying.
Just back from the Korean Open, which he lost to Peter Gade in the final, Chong Wei looked a bit jaded. Must be from the fatigue of the recent matches and travels. It's nothing to worry though, since Peter Gade lost two previous matches against him. Not bad, actually.

Being the Olympics silver medalist, which he lost out to Lin Dan, he described himself as a person who loved basketball. Well, a good thing his mother put some sense into him to play badminton. He is in a better spot now!!


The prime motivator to his current success is his coach cum mentor, Datuk Misbun Sidek. A cherished player by his own right, Misbun has been the strong guiding force to Chong Wei's achievement. He simply put the importance of trust between them that is the pinnacle of their success.

Misbun saw talent in Chong Wei about 8-9 years ago, and requested to have him under his direct tutelage. The move worked marvelously.

Now Chong Wei is at the top of badminton world!

What Misbun likes about Chong Wei's approach was he wants to listen; full trust to the mentor. And Misbun is a disciplinarian in which he got the full brunt from his late father. He needs a strong player to withstand his strict training regimes.

Any training regime put by Misbun, Chong Wei will do. Simple. It may sound old school, but with Misbun's understanding of the game both on and off-court, it is not surprising that Chong Wei can deliver. With proper guidance, real talent can be transformed into success.

Chong Wei's capability cannot be refuted, with his ability to do whatever the coach's will is something rare indeed. Himself a stroke player, some of the power drills requested during a match he will do. Change gameplans? No problem. Now that require a huge amount of skill. Kudos to Chong Wei!!

On a lighter note, Chong Wei did confess that his first motivator was his desire to own a car (which Misbun asked the first time about his badminton goals). That remark made the crowd burst into laughter. It may be funny, but it worked wonders.

Look at him now. He is at the top of the world!


More photos can be viewed HERE. (Click the link).
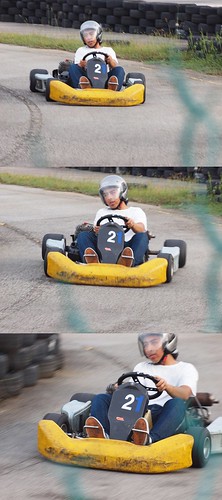
Tuesday, January 27, 2009

Zuiko and Zoom Blur

One thing I love about In-body Image Stabilization system is the capability to use any lens and be assured with some form of stabilization.

With the E-510 and Zuiko Digital 11-22mm f2.8-3.5, I was able to create this zoom effect. It was simple really!

The surreal effect with the focus on the central photographer was simply magical! Dynamism was captured in a static scene.

This scene was shot in McDonald's near Chinatown KL, with the other Olympus gang for our 2nd walkabout. This walkabout covered parts of Chinatown and Central Market during Deepavali in 2007.

I just selected a slow shutter speed, say 1/5s, and used Shutter priority to override the shutter automation. With this effect, I managed to travel the focal length from 11mm to 14mm. The ISO was 100, with aperture at f3.2. And the IS did the rest!


Another example of zoom blur...


E-510 with Zuiko Digital 14-54mm f2.8-3.5
14mm to 25mm zoom, 1/2.5s, f8, ISO200

Another thing. Be sure to have steady hands; one to hold the body, the other to twist the zoom ring.

Somehow, it was so easy even with the little E-510 beginners D-SLR!!

Sunday, January 25, 2009

Zuiko and ISO3200

Most people say, the small sensor 4/3 system is noisy. While it's true to a point, it is not as bad as it seems. With proper treatment, and understanding of Olympus' philosophy in noise management, the noise can be tamed. One thing to understand is that the E-3 has one of the best shadow gradations, albeit quite a limiting highlight gradations. The rich shadow gradations ensure stunning tones, but is guilty of showing lots of noise in high ISO situations.


The image below was shot in ISO3200 with Noise Filter set to Standard. With accurate exposure, the noise was well controlled. That's the trick. Nail the accurate exposure, and the shot will be fine. And thank goodness to E-3 accurate metering, this should not be a huge problem.


E-3 with Zuiko Digital ED50-200mm f2.8-3.5 SWD
200mm, f3.5, 1/30s, ISO3200

This image was captured at the beach of Jimbaran, Bali. Two ladies purchasing corn from the peddler. I was just sitting at the dinner table about 50 feet away. With the long reach of the 50-200mm lens, and E-3's super great Image Stabilization, all I needed was a few shots to get it right.


Click on the image for 2048 x 1536 size.

Zuiko and Kids in Pool

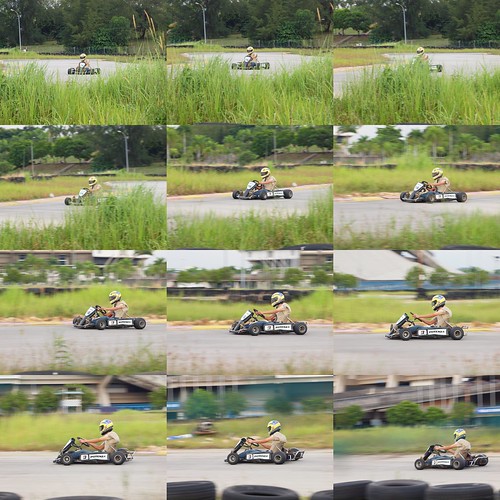
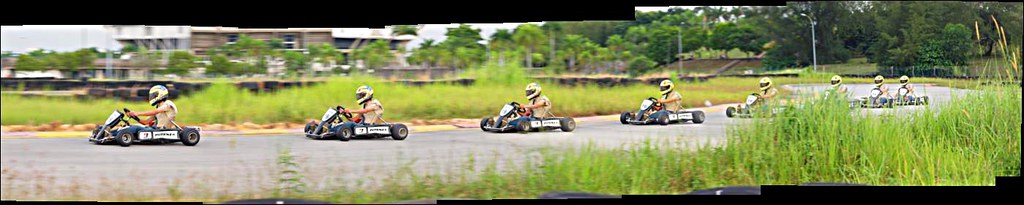
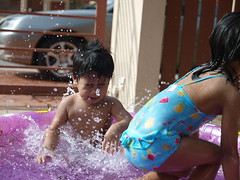
Shooting in strong sunlight is a bit tough without a flash. Backlighting is a killer.

It was morning around 10am, and the kids were playing in the kiddy pool. Sunlight was about 45 degrees up, and posed difficult for me to get the shots right.

Enter the FP Flash using the FL-50R.

Using E-3 with the Zuiko Digital ED14-35mm F2.0 SWD, I had no fear shooting up close with the splashes! Both were weather-sealed.

The main picture was captured at 31mm with the aperture at F2.0 for shallow depth-of-field. My daughter was sharp, my son was blur. Shutter speed was 1/1250s with ISO100 and +0.3EV compensation. Fill-flash by the FL-50R ensured the my children were not shadowed by the backlight. With FP turned on, I was able to shoot wide open.

Auto White Balance was accurate, color was Natural with all settings at default. Straight out of camera JPEG, the E-3 is the best in the league!

My post-process was done in Olympus Studio v2.22, with only USM at 120%, 1.2, 0 and resized to 2736 x 2052 pixels.


The rest of the images. For a complete slideshow, click HERE.

Zuiko and the Fly

The fly, or lalat in Malay. An irritating little creature.


I found this fly, sort of docile, on the front gate. It was not afraid of my lens just mere centimeters away. Great!!


It was cloudy, and I quickly attached the EC-14 teleconverter to the Zuiko Digital ED50mm F2.0 MACRO lens. This combination had quickly transformed the lens to a 1:1.4 macro. Postprocessing, I cropped this image another 1.4x to make it a 1:1 magnification. And this was with the 4/3 format. If I was using a Full Frame camera, the macro is similar to 2:1 magnification.


The greatest challenge was to get enough depth of field. As I was shooting handheld, a mere movement will move the focal plane out of focus with the fly. It was tough, but luckily the E-3 had a handy MF mode combination.


Focusing mode was MF with the S-AF single activated using the AEL/AFL button. I spotted the focus, and triggered the shutter. There were many shots and this shot was the one I was looking for.


It was not easy, with the low light. Imagine EV8 outdoors. Just for comparison, EV15 is F/16 rule. Now, that really was a cloudy day!


E-3, 50mm F2.0 Macro with EC-14
A-priority, 70mm, F3.5, 1/125s, ISO800

A strong boost in color saturation, with vignetting added character to the image.

Thursday, January 22, 2009

Zuiko and Birds in Flight

Shooting birds in flight was one of my challenges with the E-3. Along with the Zuiko Digital ED50-200mm F2.8-3.5 SWD lens, I was able to get closer with these little flying creatures. Some of the images even had the EC-14 extender to extend the range up to 283mm F4.9!!!


The trick with shooting birds in flight is all about anticipation. The smaller the bird, the higher the anticipation. The higher the anticipation, the tougher the shot.


With anticipation in mind, the best method to get sharp images is to use high shutter speed with large aperture. ISO value is best left at Auto.


Find the bird, scan its surroundings and its habits of flight. The best is to find it perching, and anticipate its next flight movement. Set the focus to Manual (MF), and lock. As the bird move scan and shoot bursts of 5fps. And hope for the best!


The beauty of the E-system is that it is possible to shoot at 283mm range (equivalent to 566mm in Full Frame) with a kit that is fast enough at F4.9 with just a 1120g lens! Thus, it will not easily tire your arms to scan and pan to anticipate the birds' flight plan.


283mm, Shutter priority

F4.9, 1/2500s, ISO800, -0.3EV


283mm, Shutter priority

F4.9, 1/2000s, ISO800


200mm, Aperture priority

F3.5, 1/1250s, ISO2000, -0.3EV


This was my last image with the ED50-200mm lens. I eventually sold it within one week after this shot.


184mm, Aperture priority

F7.1, 1/800s, ISO400

Wednesday, January 21, 2009

E-30: Shooting Low and Clean

I put my camera low under the flower shrubs, with the FL-50R on the right side low. I flipped out the LCD, snapped up the on-camera flash, angled the lens sky ward, framed the shot while adjusting the LCD view... CLICK... KERRR-CHAAK!

Voila!!


E-30, Zuiko Digital 14-54mm
27mm, F6.3, 1/320s, ISO200, ESP Metering
Remote flash setting: RC (Ch1, Lo), A (FP TTL, -2.0), B (OFF), C (OFF)


Here is how....

One of the cute features of E-30 is the flippable screen a-la camcorders. I love it, very much!!!

It enables me to take some nice angles. Fantastic!!!!

Also, notice that all 11 nicely-spaced focus points are usable. With the help of the nifty little histogram graph on the bottom left, getting the right exposure is like having a walk in the park.

For this shot, I cradled the E-30 just above ground pointing upwards, just next on the left side of the FL-50R flash.

*Note: The tripod was not used during this shooting because it was not low enough. It was meant for demonstration of the LCD screen.


As for the flash setting, I shot at full FP TTL setting. This enabled high shutter speed up to 1/8000s for flash shooting. Cool!! (By the way, Olympus invented this capability with the OM-4Ti and F-280 flash back in the 80's).

Since the morning sun filled the top part of the flower, I only needed a single flash to illuminate the dark shadowy parts.

Everything was TTL. So easy! Boy, I love simple automation! Gone are the days of Auto or Manual mode flash.

The flower was graciously captured whithout having any of my body parts dirty and aching (definitely avoided doing some contortion stuff).


Another thing, did I tell you that the 14-54mm can focus up close to 22cm, enabling up to 1:4 magnification (if we are talking in FF terms, this is 1:2). Awesome!!!

Thursday, January 15, 2009

E-30 and Soft Interiors

This was a shot of my Company's Office Lobby. The reception desk was just over to the right, and was not part of the image.

This image was shot with Live View, and I used the Level Gauge to ensure the Horizontals and Verticals were accurate. With the 14mm field-of-view, getting right-angle perspective was the challenge.

This was a cinch with the E-30!!!


Zuiko Digital 14-54mm f2.8-3.5 II; 14mm, f2.8, 1/60s, ISO640
Notice how the soft focus effect rendered the dark tones lighter. It's done subtly with glowing effect. Somehow, this reminded me of mild Orton Effect.


Comparatively, this image I set to Vivid color mode, with Contrast +2, Sharpness +1 and Saturation +1. In particular, I tried to get the high impact look of the interiors, and popping up the colors of blue lights and red gold fish in the aquarium.

Click on the image to see 50% crop 2016 x 1512.

E-30 and Shah Alam Stadium

There's a nice vantage point overseeing the Shah Alam stadium. One fine morning, I went there to make this shot.

The crusty concrete structure, decaying with moss required the monotone treatment to enliven its magnificence. I chose ART5 GRAINY FILM filter for this shot. It was perfect.

This shot was made with the Zuiko Digital ED9-18mm f4-5.6 lens, using these settings: 17mm, F10, 1/250s, ISO200


The bottom picture was a post-processed job from the RAW file. By using the Monotone mode with Red filter and the Noise Filter to OFF, I set the base for the exposure. Then, I upped the contrast by 50 points, along with aggressive S-curve manipulation to match the above picture.


Quite a close match; disregarding the grainy effect. One thing to point out, the post-processed image lacked the gritty and raw edge to the overall feel compared to the Grainy Film.

Noise is GOOD!!!

Click on the image to see 25% crop 1024 x 768.

Wednesday, January 14, 2009

E-30 and Marigolds

E-30, 35mm, F3.2, 1/200s, ISO200
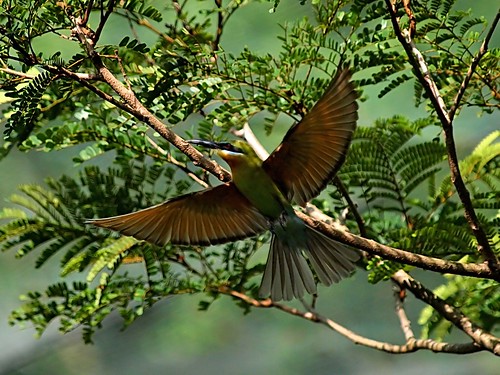
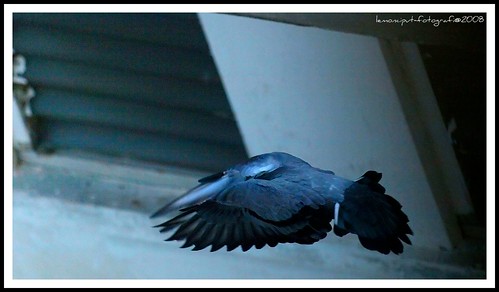
I was quite keen to see the level of sharpness the 12.3MP can deliver when combined with one the best optics to offer.


I was perching on a ledge of a flower bed, and by using the Live View function, it was easy to simply compose the shot. Because the E-30 has 11 twin-cross AF points, I did not have to do the old "focus and recompose" method. By the way, by doing that, my depth-of-field control will not be accurate due to parallax error. All I did was, select the AF point that nicely overlaid the main flower. Simple!


At the time, I had the Zuiko Digital ED14-35mm F2.0 attached to the E-30. Although it was quite difficult to shoot with extended arms during Live View shooting, the well-balanced lens weight ensured a comfortable hold.


Since I shot this in ORF format, I was able to extract the minutest details by setting the Noise Filter to OFF. Also, color was set to Vivid to enliven the rich marigold tones, and contrast was set to Low Key for added saturated feel. Additional Sharpness at +1, with all RAW to JPEG processing done in Olympus Studio v2.22.


The sharpness of the main flower was further amplified with a rendition of soft bokeh to the background. This zoom lens was just marvelous. The whole capture was made elegantly.


To view the image in 50% crop (2016 x 1512), just click it. (I only look at 50%. It's enough to see how good the image quality is).

Tuesday, January 13, 2009

E-30 and Colorful Night Lights

I was at Sunway Pyramid one night.

The beautiful night lights that adorned the shopping mall was not to be missed. Here is a handheld night capture using the Zuiko Digital ED9-18mm F4-5.6 lens.
Please click on image for 100% view.

E-30 with Zuiko Digital ED9-18mm F4-5.6

Light Tone, 18mm, f5.6, 1/13s, ISO800


E-30: Tones Comparison

I was in the car, going back from work. As I was passing under the overpass, I was struck by this scene. I was going west, so naturallly the sunset struck the building and resulted in an interesting contra joure effect.

Stuck in the traffic crawl, I quickly reached for the E-30 with the Zuiko Digital ED9-18mm f4-5.6 which was in the E-system bag at the back seat. All the settings were just right, and all I needed to do was to select the ART4 Light Tone filter.

Frame, focus, snap!

All were done in a mere few seconds.

The top image is normal with +0.3EV correction using Olympus Studio RAW, the middle image is Shadow Adjustment Technology adjustment, and the bottom image is the ART4 Light Tone filter effect.


From the SAT image, it was apparent that the shadows were retrieved. Note the image also resulted in some noise. It seemed that the retrieval was very aggressive.

From the ART4 Light Tone filter, it was apparent that the shadows were not aggressively retrieved. It was very similar to normal +0.3EV, but if compared with the tonal rendition, the ART4 provided smoother tones in a somewhat harsh and contrasty image.

I noticed, from the building with the sunlight, the Light Tone provided the best of both worlds. Subdued highlights and shadows. Tones were exquisite and pleasing to look.

I like it!!!


Saturday, January 10, 2009

E-30 and Fast Approaching AF

Continuing from the Panning section. Please read that before this blog.

Okay?

Panning was more towards technique of following the motion, and the C-AF just needed to keep track of the changes in distance within the panning azimuth's curvature. That was not really challenging enough for the E-30 AF system.

Now what?

Simple. Just shoot direct into the path of the oncoming subject.

This driver was fast approaching, with the similar C-AF panning setting, I just tracked the number "2" emblazoned on the Go-kart. Rapid movement was captured sharply on every frame.

Hahaa!.. I forgot to mention this. This was the first time ever, I shot go-karts or any motorized contraption with this technique.

Imagine if I had done this many times, the results could be much better! In panning and fast moving shots, experience and technique is crucial.

Nevertheless, just do it!

E-30 and Fast Panning AF

Olympus E-3 and ED12-60mm f2.8-4 SWD was billed by Olympus as the fastest AF camera in the world.

I would not know, actually!

I never really owned the 12-60mm. I used the E-3 with 14-54mm f2.8-3.5 lens, and it was really adequate for my daily use. Only a few months back did I replace the 14-54mm with the ED14-35mm F2.0 SWD lens. And yes, the 14-35mm was fast; though not as fast as the 12-60mm.

This time, Olympus claimed that the E-30 AF system as the same as E-3. Well, how else to know? I just had to shoot something fast.

I went to the Go-kart track adjacent to the Shah Alam stadium. I scouted for a good viewpoint to get dynamic panning shots. Good thing was, I found a place where I believed was popular with photographers. The whole portion of the fence was torn down, just enough space for great panning! Neat.

Since the longest lens I had was the ED35-100mm f2.0 PRO, it was the natural choice for the shots!


This was a panning shot of 12 frames, with the E-30 set at C-AF, single point, center, and normal AF point. Sequence shot was at 5fps, and Large Superfine JPEG settings. That meant about 8MB per image. Thus, at 12 frames within just 2+ seconds, it was close to 100MB!!! The SanDisk Xtreme III CF was on top of things! I used S-priority to lock in 1/125s shutter speed. The rest was in Auto mode.

Notice how the Continuous AF system tracked frames 1 & 2, and lost it in frames 3 & 4 due to the shrubs, then it regained focus from frame 5 to 12.

Excellent!

For the record, I managed to shoot 5fps continuously at LSF 8MB for up to 22 frames. That was very good!

Another shot, at 1/80s, f/10, ISO320.

E-30 and HIGH ANGLE Photography

Last Saturday was a totally frustrating day. It rained most of the day; whereas I had done some plans to do some "Strobist"shooting! If it was the E-3, I would just go out and shoot. But, since the E-30 was not weathersealed, and I was not willing to risk it, I had to "can the plan"!


Instead, I ended up shooting something interesting while in my brother's car. I purposely sat at the back seat; definitely for some close quarters shots.

Again, I think I was in love with the 9-18mm lens.

Put the camera up close to the car's ceiling, framed the shot downwards, propped the LCD screen towards me, turned on Live View, and VoĆ­la!

Coolness to the 3rd degree! The Grainy Film effect was just perfect too!!!

Please click on image for larger view.

E-30 and LOW ANGLE Photography

With the free-angle LCD, the ability to capture scenes at awkward angles was only limited to my imagination. Actually, this was nothing new as I have the E-3 with the same articulating LCD screen.

I was on my way for Friday prayers at Masjid Jamek, and the LRT was late. I seldom sat down to wait for the train, as it took only a short while for the next train to arrive.

Somehow, there was a delay that day. Look at the queue. It was long, similar to the morning rush! So, I sat down.

What to do, what to do?

I whipped out the 9-18mm, activated Live View, and shot a-la Medium Format. Haha.. Snap! Not nice.. no added dimension.

Come on boy, you can do better!

Ah, feeling tensed, I stretched out my legs, and the shoes entered the frame.

Wow! A new perspective. More depth perception.

Snapped again!

Perfect!!!

Please click on image for larger view.

E-30 and ART Filter: PIN HOLE

Pin Hole... this effect was quite common for my post processed shots. If you browse my Flickrpages, you could see how much I liked this effect.

This filter could be described as adding strong vignets to the four sides of the frame, with higher contrast and darker colors. Kind of myopic view, in my opinion.

Olympus wanted to recreate a sort of LOMO effect, kind of toyish. "This unique colour tone reproduces the peripheral vignetting and unique colour tone of photos taken with a toy camera."

The difference with my usual post processing was I did not really change the color tones; in this instance, the ART filter did some changes. The images looked a bit cheap.

It's kind of ironic, since I used the Super High-Grade ED35-100mm F2.0 PRO lens to capture this image. Why pay so much to get something so cheap? Haha... silly indeed.


A rather bland original picture without the peripheral effect.


To conclude for all 6 ART Filters; there's one thing for sure, E-30 definitely adds a new dimension to my shooting style to supplement my current E-3. I have been confidently shoot JPEG most of the time. The E-3 has an excellent Auto White Balance system, and I seldom have problem with the color tones; thus, I hardly play with colors in post-process. The E-30 is no less either.

In other words, the E-30 has put more joy to my photography. It has made cameras more fun and easier to use!

And that what matters to me.

Please click on image for larger view.
Comparison of PIN HOLE with normal setting.

E-30 and ART Filter: GRAINY FILM

Grainy Film... Kodak TRI-X anyone?

The idea to reproduce something similar in a DSLR was great! I loved it!

Gritty, high contrast, noisy... the perfect recipe for capturing the soul of an image.

What's there left? There's no color, only black & white.

So what were the added dimension required to make the image whole? The human condition and a touch of retrospect, I would say. Simply, a majority of my Grainy Film images were related to the human condition. Raw edge, emotive and gritty.


I was in the LRT, with the 14-54mk2 lens. By using the Live View, I entered a realm where people were at ease. Imagine pointing the lens while squinting into the Optical View Finder.. there would be some reaction. We are humans after all!

Compared to the color image below, there was less impact.


The intention of this filter, as explained by Olympus: "This effect recreates the rich, grainy look and tonality evoked by monochrome pictures, giving images a dramatic feel."

Please click on image for larger view.
Comparison of Grainy film with normal setting.