Blog Keywords

Popular Posts for the Month

Sunday, May 31, 2009

Zuiko and Birds of Prey

While I was residing at Bukit Jelutong, which was just adjacent to the TUDM Air Base, I had a chance to shoot a few birds, luckily some birds of prey.

This was of an eagle, circling the airspace hunting for prey. It was hovering the airspace flexing its prowess. It was breathtaking to see such scene of pure power.

I present to you the king of raptors!

E-510 with Zuiko Digital ED50-200mm F2.8-3.5
200mm, f/9.0, 1/250s, ISO100, +0.3EV


Also, there is the other version of raptor lurking over the skies of Bukit Jelutong. Usually, we will be treated with roars of jet afterburners at least twice a year - during the F1 race and National Day.

The king of the skies, supersonic jet fighters!!!

E-510 with Zuiko Digital ED50-200mm F2.8-3.5
182mm, f/3.5, 1/640s, ISO100, +0.7EV

The TUDM F-18D Hornet making a landing approach. The landing gears can clearly be seen!

There were four of them birds making the descent, in which they just flew mere hundreds of feet above me!!!! I was shooting them within the compounds of my apartment.

The speed was mind boggling, with the crescendo of thunderous jet power!! Panning was difficult.

Forget F1, this is the ultimate speed machine!!!


Zuiko and Two Peacocks

When you enter the Kuala Lumpur Bird Park, you are greeted with these beautiful and vain pheasants. These birds just litter the whole pathway of the bird park, and minding their own business. 

A beautiful profile of the Indian Blue Peacock, Pavo Cristatus.

Olympus E-3 with Zuiko Digital ED50-200mm F2.8-3.5
208mm, f/4.5, 1/1000s, ISO800, +0.7EV


Just wait for the right moment, and you will be rewarded.

A grandeur pose of the Green Peacock, Pavo Muticus.

E-3 with Zuiko Digital ED50-200mm F2.8-3.5 + EC-14 Teleconverter
283mm, f/4.9, 1/1000s, ISO800, +0.3EV


Indeed a regal sight.

Zuiko and before it Flutters By

This was a candid shot, as I remembered.

E-3 with Zuiko Digital ED50mm F2.0 Macro + EC14 teleconverter
70mm, f/4.5, 1/2500s, ISO200, -0.3EV

I was out at my garden shooting some macros, that I stumbled upon this butterfly. It was just perching on the heliconia leaf. 

The 10am sun was shining brightly; hence the perfect lighting. To top it off, the background was just bright enough to provide the ample contrast difference to accentuate the majesty of the wings.

Simply gorgeous.


Zuiko and a bit of Photo Painting

A simple painting effect.

I can't remember what program I used, but looking at the shooting date, I suspect it was using Photoshop.
E-510 with Zuiko Digital 14-54mm f2.8-3.5
54mm, f/6.3, 1/160s, ISO400

For this shot, the metering was at ESP and was not tricked by the strong backlight! I needed to ensure the shutter speed was fast enough to freeze the leaves as the wind was blowing gently; thus, increasing the ISO was inevitable. The aperture at f/6.3 was adequate to get the whole frame sharp.


Thursday, May 28, 2009

Zuiko and Digital Workflow, Part 1

Once in a while, my friends will ask me what "PP" I do to my photos. PP means post-processing the image. Most of the time I will say that I rarely PP my images. I just like the way my E-system does it. To me the color and tonal renditions are just sublime.

When I mentioned that I shoot about 90% of the time in JPEG, they are quite surprised. Well, the E-system JPEG is very flexible actually, as I am able to set the level of quality I want. The highest JPEG quality, with the compression 1/2.7 will yield a very high quality image rivaling TIFF formats. I do not really need RAW unless I am really challenged with a very high subject brightness range or a tricky mixed lighting situation.

To add to the JPEG is the excellent White Balance system, particularly on the E-3 and E-30, that enables me to confidently shoot in Auto setting even in the most difficult lighting situations. It is just that good!

Then again, to say that I do not PP my images - that is totally untrue also.

I need to PP mainly because I shoot in default Sharpness, Contrast and Saturation settings. If I really bother, I will only select the Color Mode - particularly I like the Vivid, Natural and Portrait color renditions. I tend to skip Muted, though.

Because of the default settings, sometimes my images do not generate enough "pop" that I am looking for.

Now enter my Digital Workflow.

To be fair, every serious photographer will have his/her own workflow. The process and scale are normally dictated by skill and duration. For me, my Digital Workflow can be described as minimal and quick.

My favorite image manipulation software is The GIMP. I love it simply because it is open source, and supports various effect actions that are easily available on the internet.

Now, what do I do with an image?

I normally start with the general idea of the image. This will result in cropping, either emphasizing the composition or changing the technical orientation, or even both.

Then, I will analyze the contrast and exposure. The best tool for me is by applying a contrast mask to the image. By manipulating the overlay of the duplicate image, usually in 30-40 opacity, I can easily control the strength of the contrast. This will also push or pull the shadows and highlights of the image, particularly at Zones II and VIII.

If I choose to increase contrast, I will end the workflow with a quick dash of the High Pass Filter, usually at sharpness of 4 for a 10MP image. I stopped using UnSharp Mask many months now, as I find that HPF is much more effective in sharpening the image than USM.

On the other hand, if I choose to lower contrast which is usually to counter very highly contrasty image, I will instead opt for Dodging & Burning. The selective contrast effects of this action will also simulate a sharpening effect. In a typical 10MP image, I will use a Thin Amount of 10 and Thick Amount of 30. Be careful with this effect, as too much of it will render the image unreal.

These 2 or 3 step action will result in a slight shift in color and tint, but I do not really care about it. To me, it is part of the manipulation of the overall contrast. The most important thing is to get the White Balance spot-on in the first place!


Here is an example of my typical Digital Workflow.


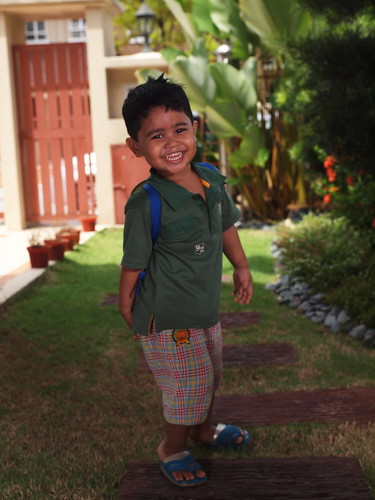
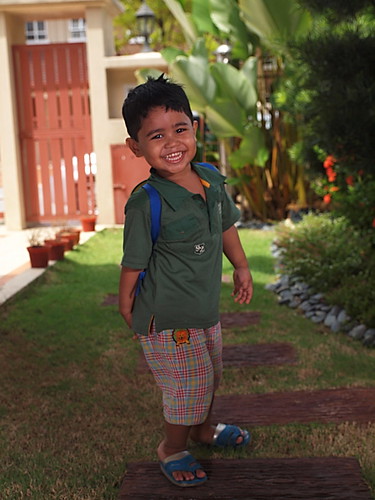
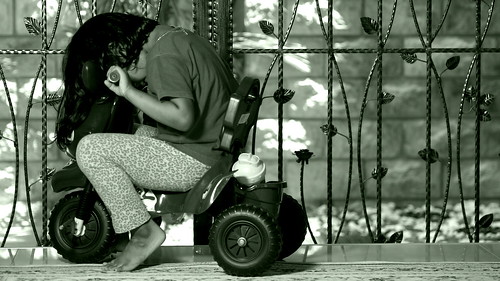
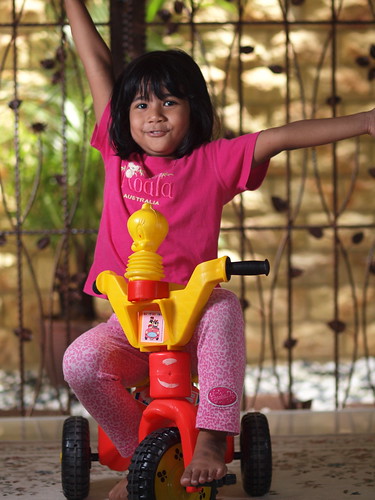
Original JPEG 1/4 compression

This image suffers from unbalanced foreground and background exposure. This is a result of the flash not providing suffient light to counter the strong ambient sunlit background. In order to balance the exposure, I choose to use the contrast mask action.


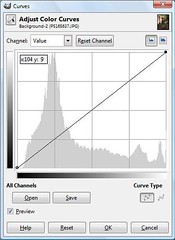
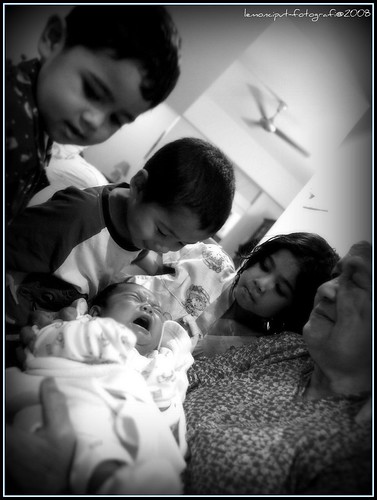
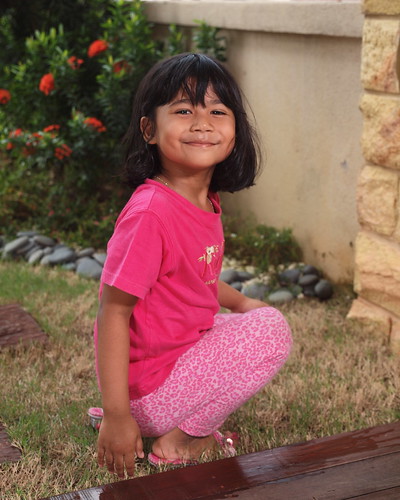
Contrast Masked, Inverted 30% Overlay with Gaussian Blur 20 pixels

By looking at the two left and right vertical grids, the histogram has shifted inwards; thus, pulling the shadows and highlights and balancing the two extremes with the middle grey.

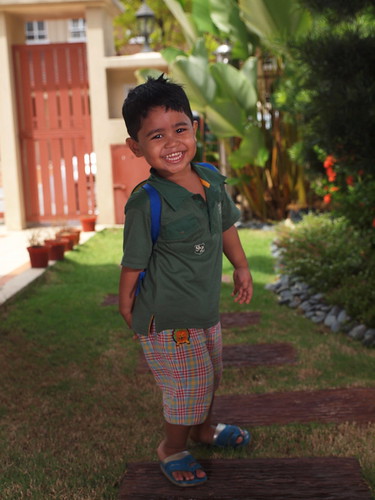
To add to the finishing touch, a hint of Dodging & Burning is applied to bring out the "pop" to the image.


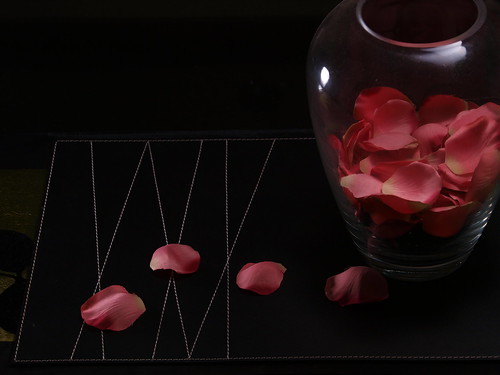
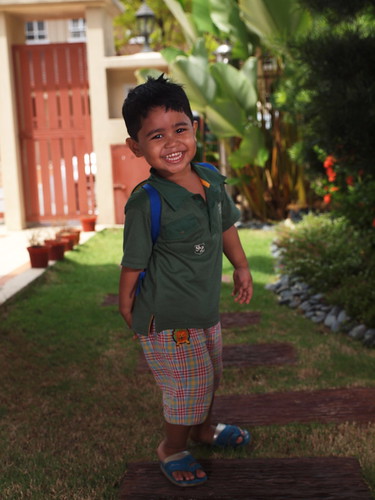
A hint of Dodging & Burning with Thin 10 & Thick 30 Amounts

The Dodging and Burning has smoothen a bit the harsh contrast transitions in the image, as can be seen in the lessening of the "spikey" lines along the histogram.

A quick PP action within 5 minutes is all it takes.

Thursday, May 21, 2009

Zuiko Digital ED14-35mm F2.0 SWD : A Personal Review

Zuiko Digital ED14-35mm F2.0 SWD

To tell you the truth, I got this lens for a bargain. I bought it used! 

It was on sale at KEAT Camera, off Jalan Pudu just only 2 months after it was launched; thus, the condition was brand new. And the price drop was very good too, up to 25%. I guess the previous owner jumped ship, and this lens went on a quick fire-sale. Good news for me!!

This lens is just crazy, optically. Tip-top performance from F2.0 to F11. Superb!! It is like having multiple primes in one lens. I will not write much on it's optical performance, as there are many independent reviews raving about it. This lens really sets the benchmark on how a zoom lens should perform - flawless!

Considering the size factor, it is huge! Just look at how it attaches to the E-30!


Weighing in at 900g and sporting a 77mm filter thread, this lens is a behemoth. But don't let the size fool you. Remember that this is an F2.0 lens. It's supposed to be big. Somehow, the mechanics of design of this lens ensure the best balance; thus, it doesn't feel as heavy as it looks. 

Now imagine a bag full of prime lenses, such as 14mm f2.0, 17mm f2.0, 25mm f2.0 and 35mm f2.0. That will be much more of a pain to manage, right?

Put it on the E-3 or the E-30, it just purrs quality. Solidly built, just-the-right heft, tactile zoom and focus rings action, weathersealed, and pure beauty; this lens means business.

I really love this lens.

Initially, I shrugged it off as being too big and too expensive. Instead, I lusted for its little brother - the Zuiko Digital ED12-60mm F2.8-4 SWD. With more range and faster focusing speed, it really made me think deep. In the end, a bargain is still a bargain. When the offer came for the 14-35mm with such great value, I could not deny my lust anymore. 

Ever since I purchased this lens, this has been my "kit lens". Serious! Not that I am crazy to lug around a 900g lens, but it's the only normal zoom lens that I own. I sold off my Zuiko Digital 14-54mm a few months later as I found out that it was slowly "collecting dust" in the dry box.

E-3 @ 14mm, f/2.0, 1/60s, ISO1600

The real strength in this lens is its usability of F2.0 aperture at all focal range. Low light performance is at the top of the game. At ISO1600 and 1/60s, I can easily get high quality images in poorly lit scenes. The 4/3 system's depth-of-field is not very shallow; thus allowing the general use at widest aperture as being very easy, too. Not bad at all!

Another subjective aspect that I love about this lens is how it resolves the color and contrast. The clarity is very high, as evident in the MTF charts. With such ultra-low light transmission loss, the lens is able to render the color and contrast much more accurately with very fine details. I have to confess, it is as good as the Zuiko Digital ED50mm F2.0 MACRO lens - the current benchmark as stated by the guys at dpreview.com.

While there is superlative performance on the optics, there is a minor flaw in the overall design of this lens with regards to the whole E-system. Similar to what is said about the 50mm lens by the dpreview.com guys, the 14-35mm suffers a problem with auto focus. It tends to jiggle and hasten to lock focus, especially at very low light - below EV4, which is very dim. Some suspect it's the problem with the SWD system. The rapid momentum of the lens is too much for the SWD motor to tame, the theory goes. Not that it's bad, but it could disturb my rhythm of shooting fast action scenes. 

E-3 v1.2 @ 30mm, f2.2, 1/250s, ISO640, +0.3EV

Olympus hasn't officially acknowledge this issue, but they are aware of it. So far, I have seen some E-3 firmware updates trying to address this. Though it couldn't solve the problem entirely, the performance of the E-3 with the latest v1.4 firmware update has closed the gap, and made shooting fast action with this lens a joy again.

I am very pleased with this lens, as it delivers. Boy, does it really deliver!!!

If you are contemplating of getting this lens, my advise is "Don't even wait for a second, just swipe your credit card. It's worth every sen!!!!!"

Wednesday, May 20, 2009

Photography 101: Basic DSLR Class

I will be conducting a Basic DSLR course this coming Saturday, 23rd of May 2009. Starting at 8pm, the beautiful KLCC Park - at the heart of Kuala Lumpur's Golden Triangle, will provide the vista for condusive learning.

Topics cover range from "Mastering the Camera" with emphasis on creative exposure and focus control, and "Mastering the Lens" with emphasis on perspective control and creative visualization.

Ending at 1pm, students will learn all the basic and important aspects of photography that will be the solid platform for intermediate or advance techniques as the students progress.

Interested?

Please contact me direct 012-2040883, as there is still available slots for this session.

Fee is RM100, with food & drinks provided.

Facebook link here.

Sunday, May 17, 2009

Zuiko and Rose Petals

A simple still-life shot.

E-3 with Zuiko Digital ED35-100mm F2.0
52mm, f/8.0, 1/500s, ISO100

Below is the setup used to get the shot. A very direct two-light approach; one from the top, one from the side.

FP TTL with Remote Controller flash at -3EV
FL-50R Ch1A +3EV (override at flash), FL-36R Ch1B +3EV (override at flash)

I shot this in Manual mode to override the background exposure to near black. Because of the shutter speed increased to more than 1/250s (max. X-sync for E-3), I opted for FP TTL setting.

In post-processing, I did a Contrast Mask action using The GIMP with Overlay at 70%. This increased the contrast, rendering the scene to be more punchy.

In the original JPEG shot, I used Vivid colors on the E-3. Thus, I expected the image to be more lively. And it did!

Saturday, May 16, 2009

Zuiko and the Tricycle Incident

Amazingly, I post-processed this using the Olympus Studio v2.22, which I do not use very often. I prefer to use The GIMP software.

E-3 with Zuiko Digital ED35-100mm F2.0
64mm, f/2.0, 1/250s, ISO100, -2EV

A simple touch-up starting with a simple crop out the unnecessary top and bottom part from 4:3 aspect ratio to 16:9. The near-cinemascope aspect added more drama.

The negative space on the right accentuated the energy of the composition.

One of the best way to express human emotion in an image is by using monotones. The graduating tones, especially with more contrast, will add tension to the image. I added about 30 points worth of contrast into this image.

I used the Green Filter to darken the skintones, and selected the Green Tint to give a quite dated look, sort of silvery corrosion to the image. 

That's all to it.

Zuiko and Lumiquest Big Bounce

A couple of Lumiquest Big Bounce in action!

E-30 with Zuiko Digital ED14-35mm F2.0 SWD
FL-50R & FL-36R diffused with Lumiquest Big Bounce

It was about time I got a diffuser to go with the wireless flash. The diffusing kit that came along with the FL-50R was not sufficient for wireless use, as the light dispersion with the kit bounce card and diffuser box was not large and soft enough.

I was thinking of getting the brolly and umbrella kit for my wireless flash setup, but decided against it as I was more of a mobile type of shooter. I like things compact and simple. The whole setup should be able to fit into my Think Tank Urban Disguise 35 bag without being bulky and heavy.

Enter... the Lumiquest Big Bounce.

FL-50R on Velbon Sherpa 250n tripod & FL-36R on Manfrotto 209 tripod
TTL setup: FL-50R channel 1A +2EV; FL-36R channel 1B +2EV.

The design is so compact, that once folded it is only the size of an A4-size paper with a thickness of about 1/4 of an inch. I can fit both Big Bounce in the laptop compartment at the rear part of the UD35 bag. It is so convenient.

E-30 with Zuiko Digital ED14-35mm F2.0 SWD
27mm, f/3.2, 1/1250s, ISO200, -1.7EV

Outdoor shooting with FP mode is good, as I thought the diffused light loss up to 3EV might provide an under-exposed lighting. But, the pulsed lights held itself, and was strong enough to compensate for the loss. The FP system enabled me to use larger f-stop to get the shallow depth-of-field to render the background blurry. Great!!!

Indoors, it was not much problem with lighting as I did not have to worry about strong sunlight.

E-3 with Zuiko Digital 35-100mm F2.0
62mm, f/2.0, 1/125s, ISO100, -1EV

The light distribution from this little gadget astounded me! Looking at how the light was broken up and softened, I am very satisfied. It can cope with the big boys brolly setups of umbrellas and softboxes. In no means I am saying this is much superior than the big boys setup, but understanding its limitation, any competent photographer is able to harness the Big Bounce strength.

E-30 with Zuiko Digital ED50mm F2.0 MACRO
50mm, f/2.0, 1/250s, ISO200, -2EV

All I can say about the Lumiquest Big Bounce is that it is a definite winner!!

Monday, May 11, 2009

Zuiko and Easy Self-Portraits

One lazy Sunday morning, I did a photoshoot. Of myself, again!!

The beauty of the E-3 and E-30 was its ability to provide live feedback while shooting self-portrait! Flip the LCD to face the intended subject, set to remote control to trip the shutter with 2 seconds delay, and activate the Live View for live framing for easier self composition.

How easy was that?

Very easy!!!!


E-3 with Zuiko Digital ED14-35mm F2.0 SWD
FL-50R & FL-36R wireless RC (camera on tripod 6 feet high)

I set the E-3 with the 14-35mm lens at 6 feet high using the Velbon Sherpa 250n tripod to get a downward angle, and made a portrait orientation; hence, the LCD was position at the highest point for easy viewing.

I looked at the LCD screen, adjusted my posture and location, and pressed the remote control. That's it.

The next two shots were made possible with the Manfrotto 209 Table-top Tripod with #482 mini ball head. The height of the E-30 and the 7-14mm lens was a mere 6 inches. The upward angle exaggerated the perspective lines and created a very elongated effect!


There were 2 flash guns. The FL-50R was on a 5-foot ladder and I mounted it on the top most step. This provided the main illumination on the left of the camera. The FL-36R was on the ground on a 6-inch tripod to provide the fill illumination and targeted the lower part of the body.


Thank God for Live View & flippable LCD screen. I shot myself using the remote RM-1 and viewing myself for the correct pose and position via peeking through the live view screen.

This is an excellent system for self-portraits!!!
Definitely!!!!

Thursday, May 7, 2009

Zuiko and "People, People, More People" Challenge

Wow!


This is the highest placing I have ever reached in the dpreview.com challenge; 6th spot!!!


Olympus E-30 with Zuiko Digital ED7-14mm F4.0
7mm, f/4.0, 1/80s, ISO640
I have been entering some images prior to this submission, and most of them were abysmal. The reason I noticed was due to the fact that I just submitted images from my Flickr database, and the composition and story of the image did not really tie strongly with the theme of the challenges.

Well, not this one. This really nailed the spot!!


The task was to "Take a shot with as many people as possible on a single frame. Try to avoid random stadium/concert shot." If you browsed through my previous blog, you can see this image as part of the coverage of the Banana Republic fashion show.


Aptly titled "Crowding to the Banana Show", the vantage point was the striking aspect. With the use of Live View with articulating LCD, and the ultra-wide Zuiko Digital 7-14mm f4.0 lens, I was able to capture the immense breadth of of people watching the show!

Definitely a great view!

Sunday, May 3, 2009

Zuiko and Indoor Wireless Flash

I was testing out the indoor shoot with the E-system wireless flash. I myself was the subject.

A simple setup with the FL-50R at a higher angle, in which I put it on a ladder 5 feet away. The FL-36R provided the lower angle with only less than 3 feet away.

The E-30 was on a tripod, and I used the RM-1 remote to trigger the shutter with a 2-second delay. Focusing was set to manual, and all shots were pre-focused.

E-30 with Zuiko Digital ED14-35mm F2.0 SWD & FL-50R/36R
35mm, f/5.6, 1/60s, ISO200, -2.0EV (FL-50R +3EV, FL-36R +2EV)