Blog Keywords

Popular Posts for the Month

Showing posts with label e-p1. Show all posts

Saturday, November 7, 2009

The Olympus E-P2, and Why I Ended Up with the S90

A lot of buzz has been happening this week regarding the launch of E-P2. Well, it turned out to be a minor tweak to the E-P1. Looking at the specs, I strongly suspect this was what the E-P1 should be. And, knowing that being the fastest to market is key in this new "compact-size, big-sensor" segment, I believe Oly rushed the E-P1 out of the oven. Nothing wrong there, but it may anger a few E-P1 owners especially it's only five months back.

I am for now still not satisfied with what Olympus is putting on the plate. For one, I somehow still want a built-in flash on it, a-la Panasonic's offering with the GF-1! Simply because I want my E-P1/2 to have a wireless-flash commander on it. I have two FL-s, and it's a waste not being able to use it with any E-P1/2 camera!

Enter the Canon S90.


Well, actually to be frank, I did not know about this camera's existence until yesterday. I was merely talking to my regular camera shop guy about the Panasonic LX-3 and it's cool retro looks. You see, I was looking for a photographer's camera that fits in a pocket. And the E-P2 was also in the list until I saw it still lacked the flash!!

He pulled out another LX-3 competitor, the Canon S90. I was not impressed, actually. I am quite hesitant with any Canon's offering except for calculators, printers, scanners and copiers. Then, he showed me the ultra-cool retro aspect of the S90; there's a Control Ring at the lens!!

Kudos!

This little contraption allows many functions that include Zoom steps of 28-35-50-85-105mm (in ancient 135 terms), Manual Focus, ISO selection, Exposure Compensation, and many other stuff. It literally won me over!!! The ease of use, akin to my E-3 and E-30 ability to allow quick access to key photographic controls meant that this the compact that I have been looking for! For many years now I have been dreaming of such a camera.

To top it off, the lens is an F2.0 at least at the wide end!!... And you guys know how am I a sucker for F2.0 lenses. I already have two F2.0 zoom lenses in my Digital Zuiko stable: the pro grades 14-35mm F2.0 and 35-100mm F2.0! With the S90's classic 28-105mm (again in ancient 135 terms) coverage, it is just perfect for nearly 80% of my typical shooting range!

And, the flash is so cool, too!!.... It's tucked nicely hidden to left of the body, which is perfect for some wireless flash action!!! (albeit only with Auto mode slave setting). Then again, the beauty of using compact P&S is the modern leaf shutter design. This means that I can sync up to maximum 1/1600s for outdoor fill-flash; not like the ancient DSLR's focal plane shutter that usually stuck at 1/250s!!!

And here it is, from Canon; which I didn't expect it to be! (pun intended, ;p) That explained why I didn't know about S90's existence until yesterday. Bummer!!!

A few haggles, and the deal was done. I am now a proud owner of a legend-in-the-making camera, similar to the E-P1!!

Here are a couple of shots with it.


Canon S90 with 6-22.5mm f2.0-4.9 lens
6mm (14mm equiv.), f/8.0, 1/1600s, ISO80, -2ev


Canon S90 with 6-22.5mm f2.0-4.9 lens
6mm (14mm equiv.), f/2.0, 1/25s, ISO800


Canon S90 with 6-22.5mm f2.0-4.9 lens
6mm (14mm equiv.), f/2.0, 1/60s, ISO200

These three pictures show the high quality of the images the S90 produce; flare control is good in strong sunlight, high ISO noise at 800 is acceptable, and the wide open bokeh just melts with goodness!

This is one camera that really elevated the standards of pocketable compacts to come.


Tuesday, August 4, 2009

Zuiko and "The Commute" Challenge


In the latest dpreview.com challenge series I entered, this image made it at 34th place out of 203 entries.

Aptly titled "Escalating to the Train", I used the Art Filter Pinhole to isolate the subject.


Friday, July 10, 2009

Zuiko and The Camera System


Camera system? What is it?

Is it something to do with just DSLRs, or other similarly complicated forms of camera? Or it's just simply photography made more complex with gadgets?

What I observe is that this term scares a lot of people thinking of doing some form of serious or enthusiast photography. It's too much for them, the thought of mixing and matching the parts of the camera to make the system work is perplexing. It's like rocket science!

Well, when I am confronted with similar questions by would-be enthusiasts, I would simply ask back this simple question: What is the purpose and interests?

Now, why would I ask that?

Simply because to build a system camera is actually fun, if you already have the main purpose in mind. Too many times I hear regrets and shortfalls in expectations in both fora and discussions on the subject. Too many times I see money not well spent for a simple need that grew into vexxing wants.

Some people jump into the DSLR bandwagon expecting the digital revolution will give them the magic wand to get beautiful pro quality image. Now, that is simply wishful thinking. And I am not touching talent and business cunningness here!! And to their realization, they can't make it to work; thus, blaming the sytem as being too complicated. The lens is not right, the noise is too bad, or simply the model is not beautiful!!

A quick analysis of their problems lies not to the gadgeteries, but to the overall workflow. To me, this is what represents the real system camera; the end-to-end workflow from image creation to image presentation.

When approaching a system camera concept, the camera itself (with it's ancilliary attachments such as lenses, portable lightings, tripods/monotpods, and supplementary power) is just a tool. Nothing more, nothing less. So does the post-processing in the camera or computer using image manipulation programs, or just simply outsource them to a very good photo lab. These gadgets are part of the overall workflow. Not to forget, a good reliable bag or carriage system that does not bog down the shooting process is also important to the workflow!

Coming back to my initial question. What is the purpose and interest? This is one of the toughest question to the aspiring enthusiasts. Most of the time, they would not know!

This is the chicken and egg moment!

In this instance, I will advise them to get the cheapest set that they can afford and use a basic image enhancement tool such as Windows Picture Manager. Well, that was where I started, too! The standard kit lens that comes with current DSLRs is already very good for the beginners, and I always ask them to explore their specialization to zero-in the best workflow.

Sometimes, only the basic DSLR kit and a simple photo lab are required. And, if this is sufficient for more than 80% of the needs, does it really matter to get into more complicated things? Well, that's a tough one!

The question is again boils down to the desire to do more. To learn more. To use better equipment. To develop better workflow. The journey to better photographic experience continues. In time, I advise them to do a reality check and review their photographic journey. Is it all worth it?

Most of the time, I find them learning something new and eager to explore new challenges. That's what makes us human, and that's also what fires the fun in exploring the ultimate camera system for them. "What lens should I buy next?", they asked. Or, "Do I need a flash?".

There is one instance when one of my friends asked me on how to do night car racing photography. My first question was "How is the lighting there? Adequate for EV8?". Well, the first thing he asked was, "What is EV8?".

E-P1 with M.Zuiko ED14-42mm F3.5-5.6
42mm, f/5.6, 1/8s, ISO1600 (EV4 lighting)

You can see that my first query was on lighting, or the existence of available light. In the end, this is the essence of photography itself!

My next query was "How are you going to handle the low quality output?" Then he replied, "Is that a problem?". In this instance, I already set the workflow in place, as the situation definitely called for some level of post-processing, especially in noisy/grainy images!

After establishing the start and the end of the process, only then I advise on the camera requirements. The lenses, the exposure, panning techniques, monopod or the need of the flash, noise reduction software, etc., etc.!

He already had the subject and interest in mind, and this made my advise so easy. I even went out to simulate the situation on a street nearby my office block. And he was amazed at how simple things are when a full understanding of the workflow can simplify a highly complicated camera system!

Bottom line, get your purpose right, and learn the strength and weakness of your workflow. If your workflow requires an expensive Full Frame system, so be it! But, it's an overkill if you are simply doing Cartier-Bressonesque style with the current Full Frame system.

There's all to it!!!

For me, I find the Olympus E-system Fourthirds, Think Tank Photo, Lumiquest, Neat Image and GIMP to be the perfect camera system for my workflow. The future; who knows. Maybe adding the MicroFourthirds into the mix?


Wednesday, July 8, 2009

E-P1 and Daffodil

Daffodil by E-P1, originally uploaded by thru-the-zuiko.

I wanted to highlight the strong colors of the petals, the yellows were so striking. The original image had the background adequately blurred, but the background was still distracting.

I cropped the image into a square format, and used the Lomo Effect filter in the The GIMP v2.4. The contrast was increased with additional saturation, while at the same time blackened the background. I further applied additional contrast with a Contrast Mask blending (without negating the mask layer), and a touch of the S-curve profile in the overall tones.

This was finished off with a sparing use of the High-pass filter for sharpening.

The yellow petals just glow in the dark for me!!

Tuesday, June 30, 2009

Zuiko and Blur


A picture need not to be perfectly focused, nor perfectly framed to be beautiful. Most of the time, the quality of light and situation are the primary factors that determine the success of the image.

E-P1 with M.Zuiko ED14-42mm F3.5-5.6
26mm, f/4.5, 1/8s, ISO1600, Manual Exposure & Focus

This picture is not in crisp focus, nor does it follow the typical Rule-of-Thirds. But, I like this picture. The excitement of speed is captured, as depicted in the streaks of light and the distorted rear wheel (it just passed over a speed bump). I really like it.

Saturday, June 27, 2009

HD Videos with E-P1 and Zuiko Digital Lenses


Romantic


An HD video at 720p with the E-P1 and two Zuiko Digital lenses; ED7-14mm F4.0 and ED50mm F2.0 Macro. AE program in Art Filter "Pop Art".


At the Mamak's


HD video, with multiple Art Filters. Shot with M.Zuiko 17mm lens (typo on the title).


Lake Gardens

Friday, June 26, 2009

E-P1 Visits KLCC Park


A couple of shots at KLCC Park.

E-P1 with M.Zuiko ED14-42mm F3.5-5.6
14mm, f/22, 1/5s, ISO100, -0.3ev, Pin Hole Art Filter

The wavy effect of the water added with the glare from the afternoon sun created a surreal effect on the overall image. Added with a rather long exposure and Pin Hole effect, the isolation of the Petronas Twin Towers is complete.


42mm, f/8.0, 1/25s, ISO100, -0.3ev, Grainy Film Art Filter

This lonely leaf struck a chord with the checkered bricks layout. It broke the monotonous repetition, sort of bring the life out of the image. The contrasting texture was exaggerated with the Grainy Film Art Filter effect. I selected a rather deep DoF to get the whole image in sharp focus.


42mm, f/5.6, 1/250s, ISO200, -0.3ev, Aperture-priority

A typical scene everyday near the pond. Scores of people taking a break to see the fountain show, and possibly just to kill time. There is a shuttle service from the Traders Hotel across the park to the Petronas Twin Towers. Great for fast moving businessmen and shoppers.

Thursday, June 25, 2009

E-P1 at a Polis Exhibition

E-P1 with M.Zuiko ED14-42mm F3.5-5.6
14mm, F/4.0, 1/80s, ISO640, -0.3ev

There was a Polis exhibition at Sunway Pyramid, and I was lucky to be there to take some quick snaps. The E-P1 with the M.Zuiko ED14-42mm F3.5-5.6 was so small that a lot of people there did not notice me shooting all the way.

And in the cramped space of the guns exhibit, the tiny E-P1 with full Live View shooting showed its real power. And the poor lights did not help either, but this did not stop from the E-P1 from getting nice shots up to ISO3200.

I simply shot and shot, without the flash, and the polis around weren't paying attention to this tiny point & shoot! A-ha! I got all the images I wanted, and that what matters.


E-P1 with Lumix G Vario 14-45mm f3.5-5.6

Lumix G1 with M.Zuiko ED14-42mm F3.5-5.6
14mm, f/3.5, 1/80s, ISO1250, -0.3ev

I was curious with E-P1's interoperability with Lumix G lenses. So, I went to Fotokem's Sunway Pyramid outlet where they have the G1 on display.

The shop girl was curious with my meddling of the heavily chained G1 body and G Vario lens. I nicely asked to test out the lens on my E-P1, and the girl told me to wait for confirmation with her boss.

While she was away, I quickly swapped the lenses.

Shooting a few shots, I was glad that both worked flawlessly. The promise of microFourthirds interoperability is confirmed.

While I was snapping away, she told me the boss said it's not possible. Alas, I already have the lens on the E-P1. She was amazed!!!

I explained that I was testing out the Lumix lens on the Olympus latest camera. She was surprised. However, she quickly complemented the camera. It's so beautiful, she said, and with a nice retro feel.

I can tell, she likes the E-P1 very much!!!

Wednesday, June 24, 2009

E-P1 and Escalating for the Ride

E-P1 with M.Zuiko Digital ED14-42mm F3.5-5.6
39mm, f/5.4, 1/80s, ISO1000, -0.3ev, Pinhole Art Filter

I particularly envisioned this shoot. I waited across the hallway of KL Sentral, exactly at the KTMB train waiting area to get a nice vantage point of the escalator carrying commuters up to the Putra LRT platform.

I selected Art Filter Pinhole to achieve a focused impact on the overall, and imposed isolation to the main subject. Lens used was the M.Zuiko ED14-42mm F3.5-5.6.

The 39mm focal length provide adequate range to capture such image, though I was about 70 to 80 feet away.

Bonus: Actually you can see my reflection in the photo!

M.Zuiko and Interior Landscape

A wide angle shot using the M.Zuiko ED14-42mm F3.5-5.6, of the interior of the KL Sentral Main Hall. The scene captures both the highlight of the sunroof and shadows of the booths. The aperture needed to be at maximum to gather more light, but in return a drop in sharpness and overall quality.

14mm, f/3.5, 1/60s, ISO640


The 100% crop suggests there is minimal barrel distortion.

"I am not angry at him, I just ignore him. I want to hear his pleading."

The second 100% crop shows some chromatic abberation at the wooden lattice adorning the sunroof.


Overall, this lens again provides very good performance at quite a challenging environment. Whether the enhancements are purely optical or software, I cannot verify now. Once I manage to open the RAW file, only the question will be answered.


M.Zuiko and a Photo Dissection

A shot of a piling machine in a construction yard.

I have dissected the picture in 3 key areas to look at the details captured by the M.Zuiko ED14-42mm F3.5-5.6 lens, which is the kit zoom lens for the Olympus E-P1.

The image is direct out of camera JPEG, with the shot settings at iAuto.

24mm, f/8.0, 1/250s, ISO200


The 100% crop of the hydraulics, at 600 by 450 pixels.


The 100% crop of the top right hand corner.


The third 100% crop at the bottom left corner.


This kit lens is quite good. At optimum setting it produces sharp images and without much optical abberations such as vignetting and distortions.

At most instances when shooting at bright sunny landscapes, adequate depth-of-field is needed. With a microFourthirds system, an aperture of f/8 is adequate to provide sufficient sharpness throughout the frame.

This lens is definitely value for money!!!


E-P1 with 4/3 Zuiko Digital Lenses


It is very interesting to note that the E-P1 supports Contrast Detection Auto Focus, aka CDAF with all Zuiko Digital lenses. Since I have 4 Zuikos, this is great!

My experience with the Zuiko Digital ED7-14mm is so far very satisfying. With the MMF-1 adapter, the balance and feel is good. A bit lens heavy, though!

With the E-P1, only Single Auto Focus works. And, during Manual Focus mode, the MF Assist is great providing 7x magnification with the slightest touch of the focus ring.


7mm, f7.1, 1/640s, ISO100, -0.3ev

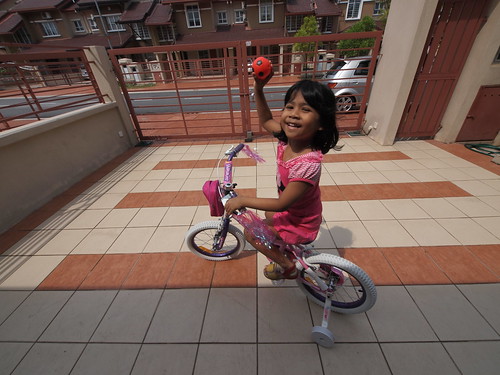
A shot of my daughter on her bicycle. Since Continuous AF is not supported, I used the pre-focus technique to get the shot. Shutter speed was adequate to freeze the motion.


Macro with the Zuiko Digital ED50mm F2.0 MACRO lens is superb. In Manual Focus, the MF Assist is a blast!

50mm, f/2.0, 1/125s, ISO2000

Don't worry, Olympus engineers have done wonders to ensure inter-compatibality between Fourthirds and microFourthirds! And the results are very reassuring!

E-P1 and Grainy Film in the Kitchen

I was just testing out the Grainy Film effect in low light conditions. Turns out to be gorgeous!

14mm, f/3.5, 1/60s, ISO1600, -0.3ev

16mm, f/3.8, 1/60s, ISO200, -0.3ev

Saturday, June 20, 2009

E-P1 and the OM Zuiko 200mm F4

I stacked the lens with the MMF-1 adapter, EC-14 teleconverter and the MF-1 adapter.


The handling is quite awkward. With such a long focal length, at 280mm, any shake is magnified. It's good thing that the In-body Image Stabilization supports manual lenses. I fed in the 300mm focal length (the closest equivalent) into the IS entry, and the lens is stabilized. Framing is much easier as the image jerking is reduced.

This is a shot of a satellite dish 20 feet above ground. I was about 20 feet away, thus estimating the total distance at about 30 feet.


280mm, f11, 1/800s, ISO100, -0.3EV

This is great for birding and motorsports!

Thursday, June 18, 2009

E-P1: A Short Review

It is not often you can get a sense of affection from an inanimate object. To get that affinity, the object must have a soul. That is exactly what the E-P1 does to me when I hold it for the first time!

Such a soulful electronic device.


The life of the camera emanates radiantly throughout; it generates a new excitement whenever I hold it up to frame a shot, it gives me the goosebumps whenever I hear the shutter sound, it envokes satisfaction to see such quality bleeding out of every nook and curve of this beautiful camera.

You guys must think I am crazy - in love with a metal alloy, filled with silicon and plastic.

Well, I can dare that if anyone of you had ever held an OM-1 with an OM Zuiko the first time, I can guarantee you will feel the same. (I never had the chance to hold a PEN; but I can say, the OM is no slouch here).

The heft, the grip, the feel.... It reminds me of my old friend that I had forgotten ever since I went full digital 3 years back. The aura and magic of the OM-1 breathes in the E-P1!

Where has Olympus been for the last 5 years?....

Okay, enough rambling now... cut the nostalgic romance! I have a review to write... sheeshh!


The E-P1


Ain't she a beauty! Metal composite body, retro-design, simple interface and a compact lens!

When I held it the first time, I noticed the weight of the E-P1. It is dense. After comparing with the OM-1, I realized that both have similar heft and feel. Retro is back! Gone are the plasticky feel of the modern machines.

Build is superb, without any feel of creaking of the body on the chassis. The lines and curves are pleasing to look and hold; and, that matters much for a camera that lacks a battery grip! Serious!

The finish is metallic with two tones of brushed and chrome metal. It is sublime. The grip indentation is black with leathery texture, further invoking the retro effect.

Notice that the built-in flash is missing. This issue is currently one of the hot debates in many a fora, and I will not dwell into it here. (Though, I really miss the RC Flash capability as there is no commander mode for the current external flash....)

Tell you what, after a few ours of shooting, I totally forgotten about the lack of a Viewfinder, be it either electronic or optical. The LCD screen is superb to provide sufficient details that it can withstand strong sunlight here in a country just a few hundred miles from the Equator. I know, I know... this is another hot debate topic in many fora, too. For me, I just learned how to get over it. It's not really a big deal shooting at arms length, considering the In-Body Image Stabilization is good up to 3 stops!
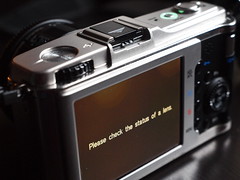

Simple and compact is the name of the game for the PEN's reincarnation. Much of the analog DNA is preserved here. Just look at the key interface at the rear of the E-P1.

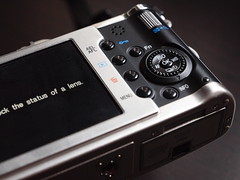
On the left, the tactile and fluid rotary mode dial presents confidence in selection, with only the key modes available - there are 8 indentations to be exact. There is the compulsory AUTO, followed with ART, SCN, HD Video, M, S, A and P modes; all lined up if rotated counterclockwise.

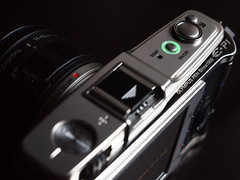
The ON/OFF button is beautifully designed. Much effort is being done here, with the button surrounded with a green light ring. Quite a nice touch!

The shutter button is located adjacent to the ON/OFF button, and the feel when engaging the shutter release is similar to E-30 or E-x10 buttons. A smaller button fills on the outer front to provide EV compensation control.

The shutter sound? What shutter sound? Well actually, with the lack of the mirror slap, the shutter actuation is much softer, very much softer then the OM-1. The shutter response is as good as a DSLR, there's hardly noticeable shutter lag. Excellent!


At the rear right control panel, there are more buttons. All intricately outlaid with much thought that my fingers do not have a cramped feeling when moving about the controls. The typical buttons are there, especially the AF, ISO, WB, AEL/AFL and Fn buttons. The OK button stands out strongly in the middle of the four-way pad, typical for all E-system cameras.

Of all the controls, the most that really catch my attention are the rotary dials. There are two!!

One is the obvious gray perching near the thumb area. The other is the hidden black ring dial, surrounding the four-way pad. This is nice! So nice, that I quickly set both dials similar to my E-3 and E-30 settings!! Sweet!!!

Can you believe it? The E-P1 has 2 rotary dials, much similar with all high-end DSLR designs!

Ooohh.. One final thing! The E-P1 uses SD memory card instead of the xD! This is great! Good riddance of such a slow processing and low capacity xD chip. Well, that means that I have to buy an SD card! No big deal, 2GB should be enough for this review.

Does this mean SD will be also be part of the next E-cameras? Only Watanabe, et. al. can tell...


E-P1 Lenses

The promise of microFourThirds is the redesigned lens mount, which guarantees more compact lenses. Does Olympus fill this promise? Definitely!


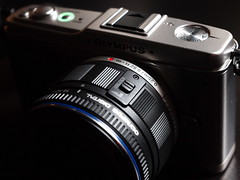
The designate zoom kit M.Zuiko ED14-42mm f3.5-5.6 lens is so compact, that it has the same size as the OM Zuiko 50mm F1.4! That is small!! It also comes with a 40.5mm filter thread, and the lens cap is an outer-pinch design, similar to earlier FourThirds lens caps.

There lies a hidden secret with regards to the 14-42mm lens, as it is actually a collapsible lens design. With a quick counter-clockwise twist of the zoom ring, the lens is extended in two overlapping extensions for usage. In actual fact, the lens easily doubles in length!! Kudos... the extensions are rigidly designed that there are minimum leeway for gaps and loose movements. Great precision. One little niggle, though. The lens front element has about 60-degrees of movement during focus. This can be a problem for Polarized filter shooting.

To collapse the lens, all I need is to twist the zoom ring clockwise whilst pushing and holding the "Unlock" lever. Somehow, there is a communication protocol with the E-P1 body to sense the lens position. The LCD screen simply darkened with a phrase "Please check the status of a lens".

Now, my first experience with this was sheer panic!! Check what status, for God's sake?!!! I really thought the lens was broken (this is not a funny situation when you are using a review unit). After a couple of minutes sweating it out to figure the mechanics of this lens, I was pleased to find this nice gimmick. Pheeww!


Another beautiful and elegant lens is the 17mm f2.8 pancake! It is just small, sporting a 37mm thread. It shares the same outer-pinch lens cap design, not the screw type of the 25mm f2.8 pancake. The Auto Focus works marvelously for such a small design. It is amazing how the Zuiko engineers manage to cramp all the mechanics and electronics in it.

Overall, the Contrast Detect AF performance is quite rapid. Though considered sluggish compared to Phase Detect AF, the time to focus on the CDAF is acceptable even for an avid user like me. Actually, I am amazed with its accuracy and consistent performance; I have yet to get out-of-focus shots. From my samples, I only shot at lowest EV5 situations and for further evaluation maybe should test the CDAF for much lower EVs. (Note that the type of shooting with this camera is not really designed for low light and action scenes).

Oh ya, another important observation... both lenses are of plastic construction! Some will hate this. To me, this is not a big deal, too. And, both do not have lens hood attachment mount. Hmmm.... Glare can be a problem here.


Well, at least the mount of the lens is made of metal. This should comfort some purists.

Optically, both lenses produce high quality images. Distortions, chromatic abberations and vigneting are greatly controlled; whether this was purely optical or software, I cannot confirm now. I will look into it later in the following blogs.

For Manual Focus lovers, the E-P1 provides focus assist function for both lenses. When the MF is engaged, with just a tiny twist of the focus ring the image is magnified 7x. The location of the magnification is dependent on the AF point selected; meaning there are 11 points to choose from depending on the shooting situation. This is nifty, especially in low light conditions when the CDAF cannot lock in low contrast scenes.


E-P1 LCD Screen


How about the electronic interface? Whilst the E-P1 MENU is much simplified from the E-420, the key elements are still there. There are mixtures of features from the E-30, too. There are 2 Camera Icons, 1 Play Icon, 1 Gear Icon (with extension up from A to I), and 1 Spanner Icon.

Another big change is the INFO button. Instead of showing the Super Control Panel, the E-P1 instead displays a Canon G9-like structure. To navigate through the icons, you can use either the scroll dials or the four-way pad. Not to worry, the operations is very intuitive. (Actually, a dpreview.com forumer pointed out to me that it is possible to activate the SCP; first press the "OK" button, then press the "INFO" button. Wow, I am back to E-system control navigation, not some G9-like interface). I like!!

One thing to note, in no way I can deactivate the LCD screen when not shooting. The LCD stays on all the time. There is a Sleep timer setting, and the default is at 1 minute.

The LCD resolution, while considered old tech with 230,000 pixels, renders sufficient detail when shooting in bright lights condition. At very low light that the pixels start to break down, and the LCD displays noisy image feedback. This can be annoying to some.

Since the EP-1 engages in full Live View shooting, i.e. the LCD is always used as the viewing screen, the full effect of color and exposure changes are shown. I find this to be very engaging as the real-time feedback can assist me in determining the final effect of the shot even before pressing the shutter release. Never has photographic experience with a DSLR quality been achieved until the E-P1 and its brother-in-arms Panasonic G1 and GH1 utilizes the live view technology in the microFourThirds philosophy. Definitely a P&S experience with DSLR satisfaction.


E-P1 Shutter Sound

A comparison of the E-P1 mirrorless shutter sound with the legendary OM-1 air-dampened-mirror shutter sound.


HD Video

I am a bit skeptic about videos on digital cameras, especially the D-SLR types. But, the trend is going that way and that's how the future will look like. Definitely video will be part of microFourthirds, but on the current Fourthirds? Only Olympus can answer that.

Video capability on the E-P1 is very basic; not as I have expected. This is what I mean.

There are two options, either High Definition or Standard Definition. For HD, there are 3 options: 1080i, 780p and 480p/576p. For my samples, I only shoot in 780p. There are no options for SD.

As for the videography controls, I can set the Aperture, Exposure Compensation, White Balance, Auto Focus, Image Stabilization and Microphone. Note that ISO or Gain (in Video terms) is not available.

There are two stereo microphones on either side of the Olympus logo on top of the lens mount. There is no wind-cut or internal noise damper. This is a bit sad. Because during focusing, the sound of the AF motor is recorded too!! And it is not a pretty sound, more like sand paper on concrete! :(

Even the Silent Wave Drive AF motor is not spared! The whooshing sound is audible.

In Auto Exposure selection, I can only select Program mode, Aperture-Priority mode, and the 6 Art Filter modes. There are no Manual or Shutter-priority modes! Well, come to think again, the E-P1 is using Focal Plane shutter, and I don't think it is possible. This is very limiting, at least for me. I find the Art Filter modes are not much of use, too; especially for the highly processed filters such as Pin Hole and Grainy Film. This processing introduced high lag time, that resulted in low shutter speed; thus, the recording looks like high FPS still images!

Once I select the video settings, and start recording, the E-P1 only allows focusing changes. Any other setting selected is not controllable. This is another bummer!! And, the focusing changes can only be done via the AFL button. If I have selected C-AF, I cannot change to S-AF or MF, and vice versa.

On playback, the images are very crisp and clear, as expected from a HD video. The audio is very good, except for the annoying AF motor sound. A typical 30 second file takes up about 120MB file space.


Well, that sums up the video experience. I am rather disappointed, or maybe I am just expecting too much.

I have added the videos in another blog entry. Check the reference section for the link.


References

E-P1 Full Specification HERE.

E-P1 Features HERE.

Pictures taken with E-P1, and pictures of E-P1 (taken with E-30) HERE.

E-P1 Sample Gallery HERE. I have allowed full resolution download on selected pictures taken using the E-P1.

E-P1 Videos samples HERE.

Less than 1 week in the Japanese market, the E-P1 stormed to #2 behind Canon Rebel. HERE.


E-P1 AF Compatibility with Zuiko Digital 4/3 lens.

So far, S-AF, MF and S-AF(MF) modes are supported. In MF mode, the AF Assist function works with quick manification of 7x.


E-P1 with Zuiko Digital ED14-35mm F2.0 SWD


E-P1 with Zuiko Digital ED7-14mm F4.0


My Personal Opinion

Out of camera JPEG is typical of Olympus E-system, with excellent color renditions. The contrast seems a bit flat, in which I think the TruePic V processing is too conservative. The 12MP sensor delivers enough resolution and color depth in Large Superfine mode similar to TIFF files. The typical size per file is reaching 8MB.

As for ISO performance, the base is 200 with great noise control up to 1600. I set the Noise Filter to LOW setting, which is same for my E-3/30. This setting does not compromise the details whilst reducing the color noise.

I have done some sample shots at ISO1600, 3200 and 6400 with the Noise Filter set to OFF. From the simple comparison with E-30 high ISO shots, I can say that the E-P1 TruePic V engine has done some credible job in reducing noise. E-P1 ISO3200 is much better than E-30's, and I can recommend shooting up to 3200. I think that's the limit, as the E-P1 ISO6400 is very noisy.


Well, who should get the E-P1?

In my opinion, it is lodged in a niche that can fit both the beginner and enthusiast. I strongly believe the mainstream market is being captured by Panasonic with its strong mass appeal in the electronics industry. Nonetheless, this does not mean that the E-P1 is inferior to the G-1 or GH-1. Travellers, street and casual shooters will find the E-P1 to be a reliable companion.

And the beauty of the microFourThirds is that the current Panasonic lenses such as the 7-14mm f4 G and 14-140mm G are fully compatible with the E-P1. The system will grow, as both companies are looking at complimenting the market rather than directly competing.


Overall, I find the E-P1 a fun yet powerful photographic tool. Despite the lack of some traditional features of the common camera design, not a speck of blame I can put to the ingenious and innovative Olympus designers and engineers. They deserve my standing ovation.

The whole package just breathe revolution!


E-P1 Rekindles the Nostalgic Romance


... with the OM Zuiko.

Image taken with E-30 with Zuiko Digital ED14-35mm F2.0 SWD

No words can describe.

Enuff said.

E-P1 as it Sneaks Out My Pants Pocket


I just got hold of the E-P1 with M.Zuiko Digital ED14-42mm F3.5-5.6, M.Zuiko Digital ED17mm F2.8 and the MMF-1 Adapter.

First impression?

The size is cute... The AF is responsive... The whole package fits in the pocket!!!

Review? Coming soon...