Blog Keywords

Popular Posts for the Month

Showing posts with label flash. Show all posts

Saturday, November 20, 2010

Zuiko and Flashed Dramatic Tone

.

Yesterday, I bought a back-issue photo magazine, if I was not mistaken it was the American Photographer. I like to read up old pro-grade magazines because to buy them new is very expensive, in the territory of RM40 for an issue. The old ones, about 5-6 months old, is about RM10.

I was particularly interested to read the article about lighting technique by Joe McNally. Apparently, the magazine showed Joe's work in Petaling Street right in the heart of Kuala Lumpur. Now I remember, Joe came here for a workshop early this year. The article was very interesting, especially about the part that he shot with full wireless TTL flash. That's very me, too!!
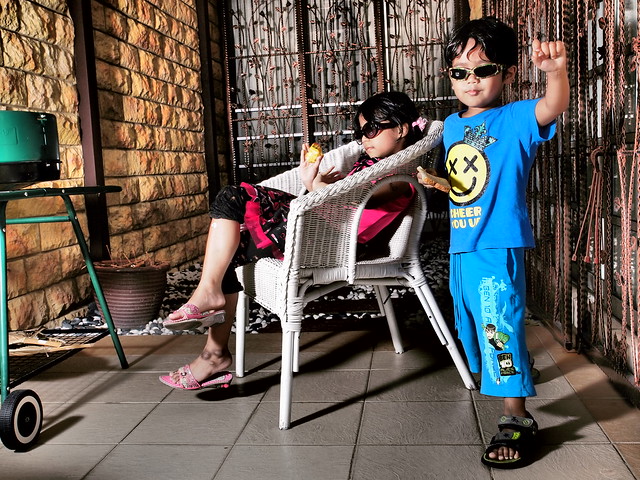

E-5 with Zuiko Digital ED14-35mm F2.0 SWD + FL-50R
19mm, f/6.3, 1/125s, ISO200, -3.0ev


Looking at his techniques and gears, I could not stand the fact that he used the Lumiquest Softbox III on his SB-900's. Prior to this, I did not hear pleasant comments about this box. I checked with a few flash shooters that I knew, and none have much good to say. But, looking at Joe's results, I might be missing something here. A quick rush to the nearby camera store, J-One at AmCorp Mall was a Godsend! They had a unit. Without hesitation I bought it immediately. On the box, it literally stated that it only works with full TTL flash.

Duh, now I get it why there were some unpleasant comments about it. Lucky me, I am a full TTL flash shooter. I just couldn't stand Manual or Auto flash settings!
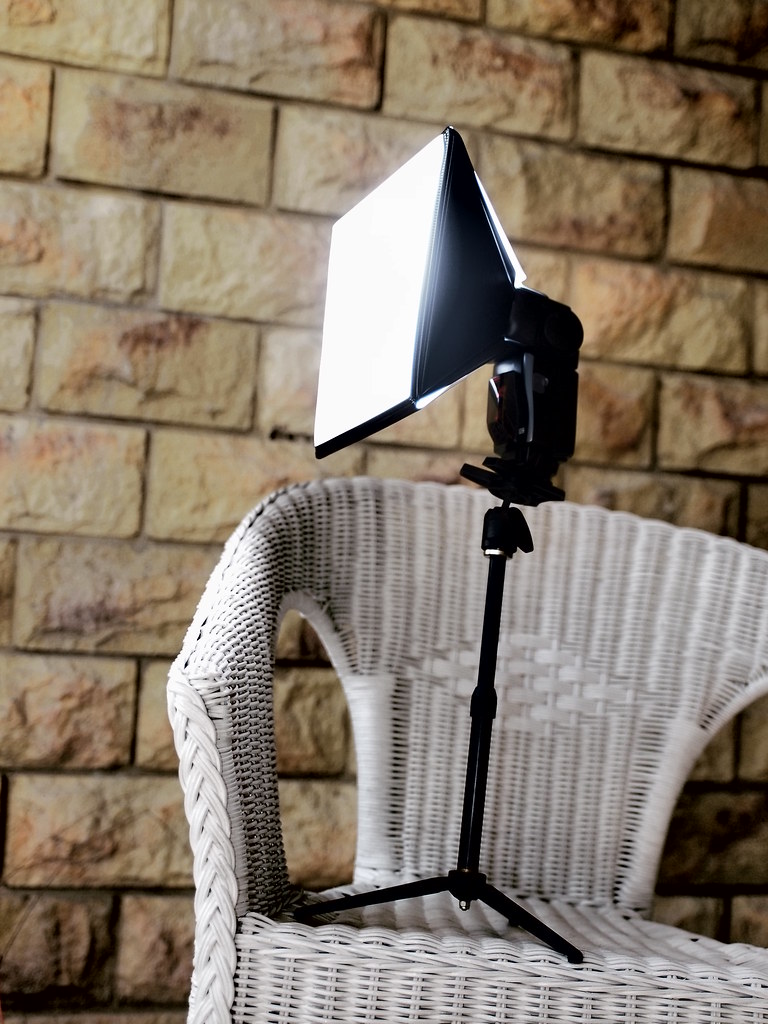


Now, having gotten the E-5 a couple of days back, I couldn't resist waiting any more. Quickly I set up the flash on the Manfrotto table-top tripod, and do a rapid TTL flash exposure setting (-3ev on the body, +1 on the flash); this setting will get me the blue sky background. All I needed was the subject. A good thing though. My kids were in a very good mood for a photoshoot. Without much hassle they did the Ultraman and Barbie poses. Shooting was a breeze, both on the photographer and the models.
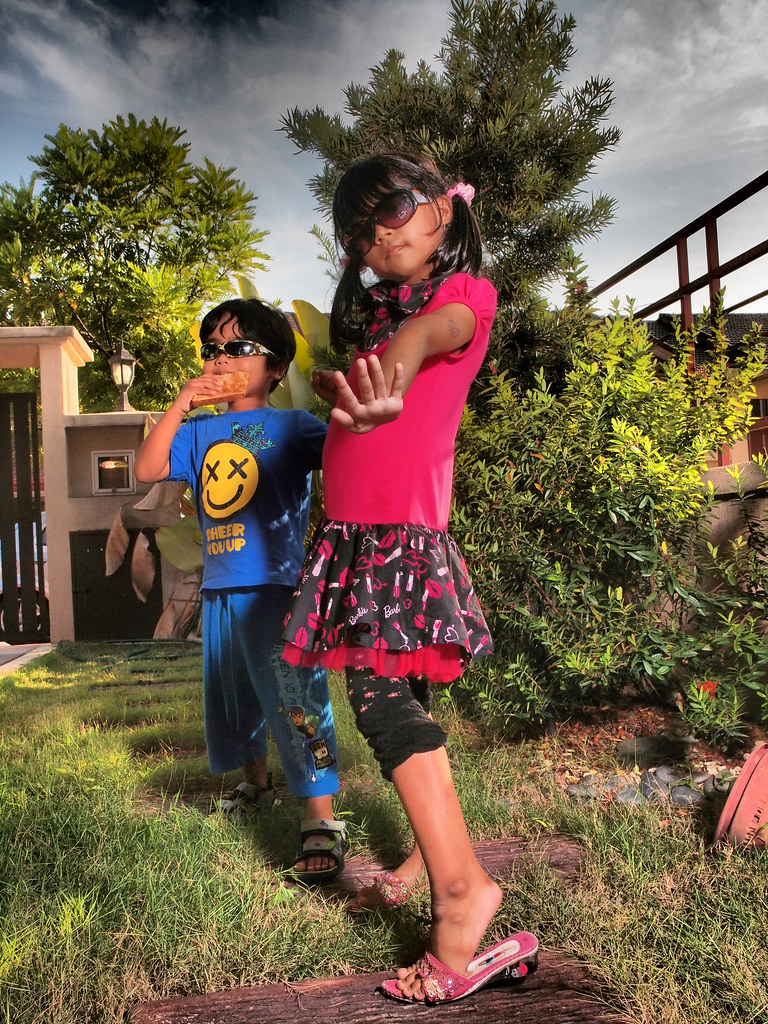

E-5 with Zuiko Digital ED14-35mm F2.0 SWD + FL-50R
17mm, f/10, 1/250s, ISO200, -3.0ev


I just loved the combination of Dramatic Tone effect with Fill-flash effect. The subject and background just popped up. No post-processing required; the output was just right!!

The E-5 continues to intrigue me in ways I have yet to fully phantom!! This is indeed the best camera Olympus have ever produced, even easily trumping the OM-4!! ( I have the OM-4 in the dry box, the shutter is jammed and I have yet to get it fixed. Bummerrrr!!!).


Tuesday, September 21, 2010

Zuiko and the Balancing Act

In my class, I cram my students with many photography nonsense. Especially with the mantra, "When outdoors in the hot sun, shoot with your flash on and 100% direct." Most of the time, my students will show blank stares disbelieving what I just said.

There are many other mantras, and one of them is, "If you don't like a person in a group picture, please use a wide angle lens." Well, this may be a good topic for another blog. For now, let me stick to the hot-sun-flashing-shooter thing.

Ah, well... I give them the assignment, and these are the results.


E-30 with Zuiko Digital ED14-35mm F2.0 SWD + FL-50R Flash
33mm, f/11, 1/250s, ISO100, -2ev, flash +1ev

My approach is simple. Most of the time, the camera using Matrix metering is quite smart enough to detect the background exposure. Thus, by dialing down the overall exposure compensation to -2ev, the background is darkened. The flash, then is set at higher compensation, say +1ev, to illuminate the darkened scene. In total, the image has a composite of -1ev exposure, which is just the right balance for portrait with landscape picture.

The above image uses slow x-sync flash that limits the shutter to 1/250s; thus, entails for small aperture exposure. In this case, it is f/11.


E-30 with Zuiko Digital ED14-35mm F2.0 SWD + FL-50R Flash
14mm, f/3.2, 1/4000s, ISO100, -2ev, flash +1ev

Say that you are a sucker for shallow depth-of-field, or bokeh-anywhere type of shooter. Then, you can dial up the aperture to f/2 for example, and the shutter speed will still jam at 1/250s. In this case, the Matrix metering is dumb! The picture will be overexposed. The only way to jump the shutter up is to use high-speed sync, in Olympus language it's FP Flash. Be careful though when using this method, as the bulb tend to be abused with low power but long bursts of light. I killed my FL-36 during a wedding once due to FP abuse, and it was not nice!!

Notice the blur effect due to the larger aperture even at wide angle 14mm? I should have used f/2.0 to get more blur. Doh!!

Using the same exposure principles of the first picture, the second image is recreated with the same exposure balance.

Monday, April 5, 2010

Zuiko and Green Apples

.
I had some spare time after sending my daughter to Enopi Math class. The 30-minute gap was used to do some quick flash shoot.


35mm, f/4.0, 1/60s, ISO100
This was processed in High-key to accentuate the full breadth of flash coverage


Green apples.. that looked simple but cool!

How did I do a 2-minute setup?

Get the E-30 with a moderate telephoto lens, in this case the Zuiko Digital ED14-35mm F2.0 SWD.

Get the FL-50R flash, and set to Remote mode. Quickly activate the Remote Commander menu on the E-30, and fiddle with the TTL setting.

Place the two apples on a dark glass table. Shut the room lights, and use ISO100 to blacken as much as possible the disturbing backgrounds.

Position the flash in various angles and height to see the different effects.

And don't forget the Do's and Don'ts of simple composition techniques. Rule-of-Thirds, Depth-of-Field separation, contrast isolation, parallax error, etc, etc.

Shoot in RAW only, and later process it using the Olympus Studio software. The E-30 Art Filters are available in Studio v2.2.

Voila!


By changing the angle and light intensity, a different effect was created.
This was processed in Low Key to accentuate the dark contrast zones.

Tuesday, January 12, 2010

Zuiko and a Self-Portrait


A simple self portrait I did with the E-30 camera and the Zuiko Digital ED7-14mm F4.0 lens.

I used a two-light source, main at high point, fill at low point; with self portrait composed using real-time Live View screen and triggered with a wireless remote.

I tried to do a macho look, so-called a self-portrait of the ultimate maleness in myself. Hmmm... I think I didn't do quite a good job.

The thing is, when I was doing this, I solely relied on two features in self-portrait shooting. 1. The remote trigger, in this case the usage of the RM-1 remote trigger. 2. The flippable LCD, in this case I used the LCD screen flipped facing me so that I can compose myself into the frame (this was done in full Live View mode).

Oh yeah, I used full TTL shooting with the Olympus wireless flash system; with the main using FL-50R and fill using FL-36R. The E-30 was mounted on the Manfrotto 709b table tripod for a very low angle shot.

Well, these feature made shooting self-portrait much easier. But, it still did not solve the problem that I was not a very good model.

Ah well....

Tuesday, November 3, 2009

Zuiko and DSLR 101 Class


My first batch of students...

And they hinted for more stuff....

E-30 with Zuiko Digital ED14-35mm f2.0 SWD + FL-50R
14mm, f/4.0, 1/60s, ISO800

More to be told after I conclude the next session.....


Tuesday, September 22, 2009

Zuiko and the Generation Gap


The grandma and her grandson. The latest addition, for now.

E-30 with Zuiko Digital ED14-35mm f2.0 SWD + FL-50R
35mm, f/3.5, 1/60s, ISO400, -0.3ev


This is a shot straight out of the camera, with the JPEG setting at Large Fine, or JPEG/4. The only thing I did was to resize so that I would not clog the upload bandwidth.

Olympus JPEG is just perfect to my eyes; the Auto White Balance of the E-30, to me is equal to E-3, makes shooting a joy. Why? Because I can get perfect shot, everytime!!!


Wednesday, September 9, 2009

Zuiko and the Six Sigma Team

I was approached to do a team shoot late last year. The client wanted a serious but cool corporate image. Since they were part of the Six Sigma Audit team, I understood the image they were looking for.

As for location, the company's training center lounge provided the perfect backdrop.

Prior to the shoot, I advised the team lead to get everybody up to character. This somehow helped a lot, as the when I arrived on location, they were all zoned in! All I needed was a setup of E-3, Zuiko Digital ED14-35mm f2.0 SWD and FL-50R. The situation was a bit of a mixed lighting, though. I had to think a bit about how to balance the shot.


E-3 with Zuiko Digital ED14-35mm F2.0 SWD & FL-50R
20mm, f/2.5, 1/50s, ISO200, +0.7ev

I was looking at a 3-light-source setup. The flash provided the fill, along with the sunlight from the window with the ceiling downlights strongly eminating the indoor space.

It took me five minutes to asses the situation and decide what to do.

One way to balance the lights was to shoot bright. I had two options; pump up the flash or utilize the sunlight. Apparently, I chose to get the group to pose about 5 feet from the window sill. That solved the lighting situation. Yet, I still needed the flash to bump up the shadows a bit, as I did not want a flat-looking image. Yes, the catchlight in the eyes added more pop to the shot, too.


It was quite an easy job as everybody understood their role in the shoot. I took 3 shots, and the session ended within 10 minutes.

Great job, everybody!

Monday, September 7, 2009

Zuiko and Merdeka!!!

Merdeka! Merdeka! Merdeka!

Malaysia celebrated it's 52nd year of Independence last week, on the 31st of August to be exact.

Celebrations were low key this year due to Ramadhan. Yet, this should not hamper the spirit of Merdeka within the hearts of the people. Patriotism for the country should live on, irregardless of many differences in opinions be it race, religion or politics.

E-510 with Zuiko Digital 14-54mm f2.8-3.5 & FL-36

27mm, f/5.6, 1/50s, ISO400


I remembered one shot I did in 2007 that captured the spirit. This was an impromptu shot, with my colleague quickly draped the Jalur Gemilang across his body.

Thursday, May 28, 2009

Zuiko and Digital Workflow, Part 1

Once in a while, my friends will ask me what "PP" I do to my photos. PP means post-processing the image. Most of the time I will say that I rarely PP my images. I just like the way my E-system does it. To me the color and tonal renditions are just sublime.

When I mentioned that I shoot about 90% of the time in JPEG, they are quite surprised. Well, the E-system JPEG is very flexible actually, as I am able to set the level of quality I want. The highest JPEG quality, with the compression 1/2.7 will yield a very high quality image rivaling TIFF formats. I do not really need RAW unless I am really challenged with a very high subject brightness range or a tricky mixed lighting situation.

To add to the JPEG is the excellent White Balance system, particularly on the E-3 and E-30, that enables me to confidently shoot in Auto setting even in the most difficult lighting situations. It is just that good!

Then again, to say that I do not PP my images - that is totally untrue also.

I need to PP mainly because I shoot in default Sharpness, Contrast and Saturation settings. If I really bother, I will only select the Color Mode - particularly I like the Vivid, Natural and Portrait color renditions. I tend to skip Muted, though.

Because of the default settings, sometimes my images do not generate enough "pop" that I am looking for.

Now enter my Digital Workflow.

To be fair, every serious photographer will have his/her own workflow. The process and scale are normally dictated by skill and duration. For me, my Digital Workflow can be described as minimal and quick.

My favorite image manipulation software is The GIMP. I love it simply because it is open source, and supports various effect actions that are easily available on the internet.

Now, what do I do with an image?

I normally start with the general idea of the image. This will result in cropping, either emphasizing the composition or changing the technical orientation, or even both.

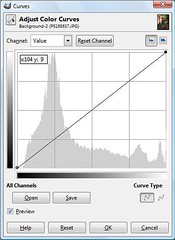
Then, I will analyze the contrast and exposure. The best tool for me is by applying a contrast mask to the image. By manipulating the overlay of the duplicate image, usually in 30-40 opacity, I can easily control the strength of the contrast. This will also push or pull the shadows and highlights of the image, particularly at Zones II and VIII.

If I choose to increase contrast, I will end the workflow with a quick dash of the High Pass Filter, usually at sharpness of 4 for a 10MP image. I stopped using UnSharp Mask many months now, as I find that HPF is much more effective in sharpening the image than USM.

On the other hand, if I choose to lower contrast which is usually to counter very highly contrasty image, I will instead opt for Dodging & Burning. The selective contrast effects of this action will also simulate a sharpening effect. In a typical 10MP image, I will use a Thin Amount of 10 and Thick Amount of 30. Be careful with this effect, as too much of it will render the image unreal.

These 2 or 3 step action will result in a slight shift in color and tint, but I do not really care about it. To me, it is part of the manipulation of the overall contrast. The most important thing is to get the White Balance spot-on in the first place!


Here is an example of my typical Digital Workflow.


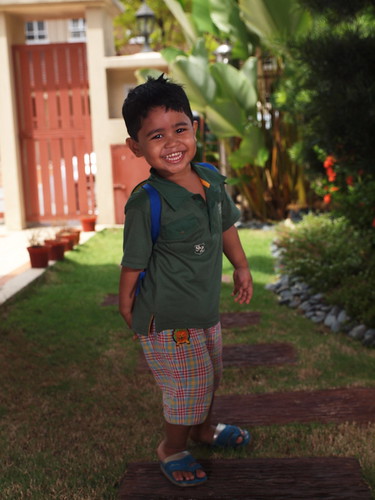
Original JPEG 1/4 compression

This image suffers from unbalanced foreground and background exposure. This is a result of the flash not providing suffient light to counter the strong ambient sunlit background. In order to balance the exposure, I choose to use the contrast mask action.


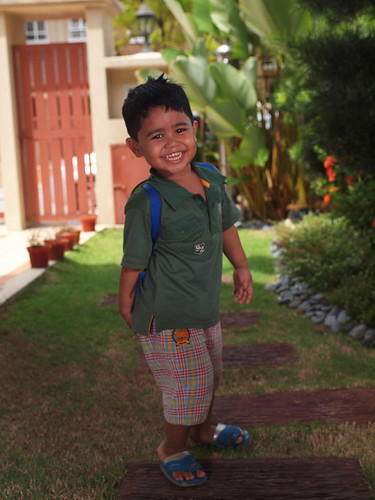
Contrast Masked, Inverted 30% Overlay with Gaussian Blur 20 pixels

By looking at the two left and right vertical grids, the histogram has shifted inwards; thus, pulling the shadows and highlights and balancing the two extremes with the middle grey.

To add to the finishing touch, a hint of Dodging & Burning is applied to bring out the "pop" to the image.


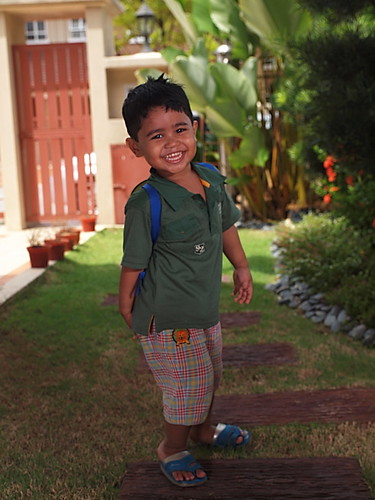
A hint of Dodging & Burning with Thin 10 & Thick 30 Amounts

The Dodging and Burning has smoothen a bit the harsh contrast transitions in the image, as can be seen in the lessening of the "spikey" lines along the histogram.

A quick PP action within 5 minutes is all it takes.

Sunday, May 17, 2009

Zuiko and Rose Petals

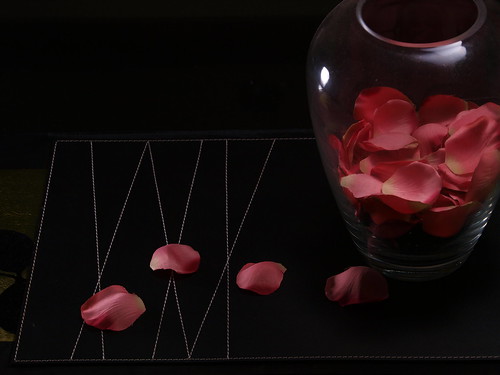
A simple still-life shot.

E-3 with Zuiko Digital ED35-100mm F2.0
52mm, f/8.0, 1/500s, ISO100

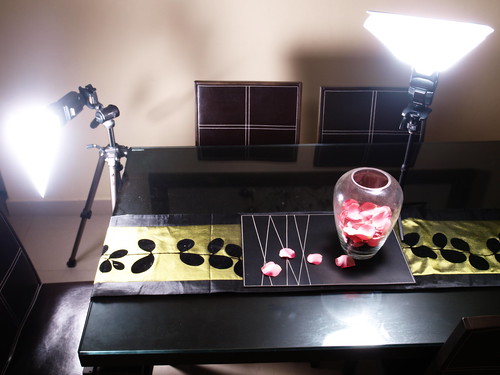
Below is the setup used to get the shot. A very direct two-light approach; one from the top, one from the side.

FP TTL with Remote Controller flash at -3EV
FL-50R Ch1A +3EV (override at flash), FL-36R Ch1B +3EV (override at flash)

I shot this in Manual mode to override the background exposure to near black. Because of the shutter speed increased to more than 1/250s (max. X-sync for E-3), I opted for FP TTL setting.

In post-processing, I did a Contrast Mask action using The GIMP with Overlay at 70%. This increased the contrast, rendering the scene to be more punchy.

In the original JPEG shot, I used Vivid colors on the E-3. Thus, I expected the image to be more lively. And it did!

Saturday, May 16, 2009

Zuiko and the Tricycle Incident

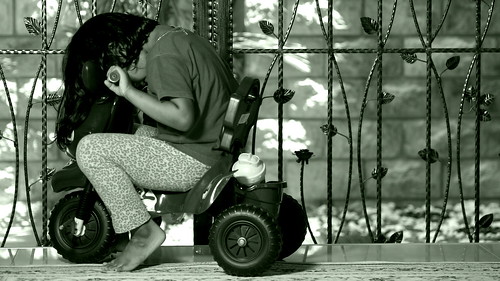
Amazingly, I post-processed this using the Olympus Studio v2.22, which I do not use very often. I prefer to use The GIMP software.

E-3 with Zuiko Digital ED35-100mm F2.0
64mm, f/2.0, 1/250s, ISO100, -2EV

A simple touch-up starting with a simple crop out the unnecessary top and bottom part from 4:3 aspect ratio to 16:9. The near-cinemascope aspect added more drama.

The negative space on the right accentuated the energy of the composition.

One of the best way to express human emotion in an image is by using monotones. The graduating tones, especially with more contrast, will add tension to the image. I added about 30 points worth of contrast into this image.

I used the Green Filter to darken the skintones, and selected the Green Tint to give a quite dated look, sort of silvery corrosion to the image. 

That's all to it.

Zuiko and Lumiquest Big Bounce

A couple of Lumiquest Big Bounce in action!

E-30 with Zuiko Digital ED14-35mm F2.0 SWD
FL-50R & FL-36R diffused with Lumiquest Big Bounce

It was about time I got a diffuser to go with the wireless flash. The diffusing kit that came along with the FL-50R was not sufficient for wireless use, as the light dispersion with the kit bounce card and diffuser box was not large and soft enough.

I was thinking of getting the brolly and umbrella kit for my wireless flash setup, but decided against it as I was more of a mobile type of shooter. I like things compact and simple. The whole setup should be able to fit into my Think Tank Urban Disguise 35 bag without being bulky and heavy.

Enter... the Lumiquest Big Bounce.

FL-50R on Velbon Sherpa 250n tripod & FL-36R on Manfrotto 209 tripod
TTL setup: FL-50R channel 1A +2EV; FL-36R channel 1B +2EV.

The design is so compact, that once folded it is only the size of an A4-size paper with a thickness of about 1/4 of an inch. I can fit both Big Bounce in the laptop compartment at the rear part of the UD35 bag. It is so convenient.

E-30 with Zuiko Digital ED14-35mm F2.0 SWD
27mm, f/3.2, 1/1250s, ISO200, -1.7EV

Outdoor shooting with FP mode is good, as I thought the diffused light loss up to 3EV might provide an under-exposed lighting. But, the pulsed lights held itself, and was strong enough to compensate for the loss. The FP system enabled me to use larger f-stop to get the shallow depth-of-field to render the background blurry. Great!!!

Indoors, it was not much problem with lighting as I did not have to worry about strong sunlight.

E-3 with Zuiko Digital 35-100mm F2.0
62mm, f/2.0, 1/125s, ISO100, -1EV

The light distribution from this little gadget astounded me! Looking at how the light was broken up and softened, I am very satisfied. It can cope with the big boys brolly setups of umbrellas and softboxes. In no means I am saying this is much superior than the big boys setup, but understanding its limitation, any competent photographer is able to harness the Big Bounce strength.

E-30 with Zuiko Digital ED50mm F2.0 MACRO
50mm, f/2.0, 1/250s, ISO200, -2EV

All I can say about the Lumiquest Big Bounce is that it is a definite winner!!

Monday, May 11, 2009

Zuiko and Easy Self-Portraits

One lazy Sunday morning, I did a photoshoot. Of myself, again!!

The beauty of the E-3 and E-30 was its ability to provide live feedback while shooting self-portrait! Flip the LCD to face the intended subject, set to remote control to trip the shutter with 2 seconds delay, and activate the Live View for live framing for easier self composition.

How easy was that?

Very easy!!!!


E-3 with Zuiko Digital ED14-35mm F2.0 SWD
FL-50R & FL-36R wireless RC (camera on tripod 6 feet high)

I set the E-3 with the 14-35mm lens at 6 feet high using the Velbon Sherpa 250n tripod to get a downward angle, and made a portrait orientation; hence, the LCD was position at the highest point for easy viewing.

I looked at the LCD screen, adjusted my posture and location, and pressed the remote control. That's it.

The next two shots were made possible with the Manfrotto 209 Table-top Tripod with #482 mini ball head. The height of the E-30 and the 7-14mm lens was a mere 6 inches. The upward angle exaggerated the perspective lines and created a very elongated effect!


There were 2 flash guns. The FL-50R was on a 5-foot ladder and I mounted it on the top most step. This provided the main illumination on the left of the camera. The FL-36R was on the ground on a 6-inch tripod to provide the fill illumination and targeted the lower part of the body.


Thank God for Live View & flippable LCD screen. I shot myself using the remote RM-1 and viewing myself for the correct pose and position via peeking through the live view screen.

This is an excellent system for self-portraits!!!
Definitely!!!!

Saturday, April 25, 2009

Zuiko and Outdoor Flash Photography

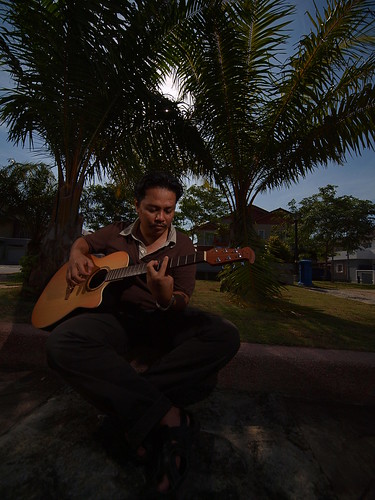
Playing with wireless flash, the primary on the right and the fill on the left. I set the flash to Super FP mode allowing high shutter speed capabilities, so that I have full control of the aperture range from f/2.0 to f/16.0.

My intention was to get this darkened effect. What did I do?

E-3 with Zuiko Digital ED7-14mm F4.0 & FL-50R + FL-36R
7mm, f/4.0, 1/4000s, ISO100, -1EV

Camera setting:
  • Select aperture priority with remote commander activated
  • Lower the overall exposure by -1.0EV (dial the exposure compensation)
  • Lower the RC flash to -3.0EV; this is to reduce the fill-flash from the RC
  • Set RC panel at Channel 1 & High
  • Set RC panel for Channel 1 A at +3EV with FP TTL; this is the FL-50R on the right (Main)
  • Set RC panel for Channel 1 B at +3EV with FP TTL; this is the FL-36R on the left (Secondary)
Flash setting:
  • Set both flash 5 feet away from the subject with 45-degree azimuth angle
  • Set the flash height at the eye-level of the subject, and tilt down towards the guitar
  • Put a diffuser on the Main light (adjust the FL-50R to +1EV to compensate for the diffuser light loss)
  • Adjust accordingly to get the desired illumination
My test shot showed perfect exposure for the image, but that was not I was looking for. I was looking for a darkened effect. The easiest way was to meter the blu sky directly above.

So, I just looked up and lock the camera Auto Exposure using the Spot Meter (in which I programmed in the AEL/AFL button). With the exposure locked, the overall exposure was pushed -2EV (camera already -1EV, the blue sky forced another -1EV). Hence, the darkened effect.

Some say it was underexposed, and I agreed.

To get more detail, I lifted the shadow areas using the simple Contrast Mask procedure. Whilst the effect is still darkened, you can observe the more details coming out from the shadows without sacrifing the highlights at the background.

The GIMP v2.4 with Contrast Mask at 40%
&
High Pass Sharpening at 4.0 points

Either image, that was what I wanted - a darkened effect. And I like them both.


Click image for slideshow of the whole photoshoot.

Sunday, March 29, 2009

Zuiko and "The Beautiful Game" Challenge

E-3 with Zuiko Digital ED50-200mm f2.8-3.5 & FL-50R
76mm, F/10, 1/160s, ISO100, Wireless Flash TTL

So far, this is my best entry to the dpReview.com challenge. It earned 12th spot. This challenge was titled as such because the theme was to capture "anything to do with sports aside from the players or the action itself".

The flash was located remotely to the right of the frame, approximately the same distance as the camera to the balls. This created an isosceles triangle with the balls being the reference point. Thus, the TTL measurement for the camera and the flash was similar and exposure was spot on!

The low angle of the flash created a long shadow as if the balls were witnessing a sunrise. In my opinion, that's what caught the eye of the voters in the Challenge.


Monday, March 9, 2009

Zuiko and FP Flash Portraits

Shooting with flash in bright sunlight is very important. With the correct balance between the sunlight and flash power, beautiful images can be created with minimum shadow harshness.

One of the problem with DSLR shooting outdoors with flash is the use of the focal-plane shutter. This archaic design is the bane of modern photography, and should be banned, in my opinion. But, the strength of this design compared to current modern design is still valid, though. With focal-plane (FP) shutter, very fast speeds up to 1/8000s is possible. Modern leaf shutter can only go up to 1/2000s which is evident in current point-and-shoot digicams.

With focal plane shutter, there are 2 mechanisms being used to control exposure.

For lower shutter speed, the exposure is done instanteneously throughout the frame; thus, there are no issues to sync with the flash. In olden cameras, fastest sync speed were typically 1/125s. Nowadays, most modern DSLRs have sync up to even 1/500s. Typical sync speeds are 1/180s to 1/250s.

For shutter speeds higher than the sync speed, the DSLR controls shutter exposure differently. Instead of exposing the whole frame in one moment, the shutter moves from one end of the frame to the other end of the frame creating a stroboscopic sweep of exposure. Now, here lies the problem... In order to sync with higher shutter speed, the flash needs to have FP Flash support. If not, only part of the frame will be exposed with the flash as the stroboscopic sweep is not in-sync with the flash burst.

Normal TTL flash uses impulse response upon trigger, with the flash emitting the maximum power set by the camera. It only lasts for a few microseconds. It does not need high sync accuracy; hence, the speed limitation.

FP TTL flash, an invention of Olympus back in 1986, uses step response upon trigger. The burst is set to low power but longer duration, maybe 50-100x longer than Normal TTL. With the longer burst, it is possible for the shutter sweep to be illuminated throughout the frame; thus, achieving accurately exposed image.

E-3 with Zuiko Digital ED14-35mm F2.0 SWD & FL-50R
21mm, f/3.5, 1/800s, ISO100, -1.3EV, FP Flash +2EV

In this image, I manage to get a balance between the sky and subject. Usually the camera will over-expose the sky to white to get the subject bright enough. In this case, I override by -1.3EV so that it's enough to render the sky strong blue. In order to compensate for the loss of exposure to the subject, I override the flash power to +2.0EV. Overall balance is flash +0.7EV over sunlight. In this instance, I will get a darkened effect rather than natural exposure.

Notice the shutter speed is 1/800s, which is way off E-3s 1/250s flash sync. FP Flash technology made it possible. If not, there will be two situations: white sky with nice subject, or blue sky with silhoutte subject.


Two more samples at different apertures for different Depth-of-Field.

Wednesday, February 25, 2009

Zuiko and a Wedding


Wedding photography! A type of photography that I would categorize as chaos. Not in a sense of the photographer losing his/her mind, but in the sense that the whole event is just chaos.

I would say that most of the time, the photographer has no control of the situation and must make the best out of it.

In this instance, the best way to approach it is through a technique known as wedding photojournalism.

The principle is simple. The photographer will use all the resources at hand to capture any artistic opportunity without the bride and groom's awareness. So called candid, but with a complete story to tell!

A good start to do a wedding job is to use the E-3 or E-30, with a very good zoom lens either the Zuiko Digital 14-54mm f2.8-3.5 or the Zuiko Digital ED12-60mm f2.8-4.0. A strong flash is a must; thus, only the FL-50R qualify. The battery grip will be also helpful to double the shoot rate and to assist in portraiture framing. Carry spare batteries for the body and also the flash. A high capacity memory card is recommended such as the SanDisk Xtreme III 4GB or 8GB.

Additional lenses to assist include the Zuiko Digital ED50-200mm f2.8-3.5, Zuiko Digital 11-22mm f2.8-3.5 and the Zuiko Digital ED50mm f2.0 Macro. Though, I would say that the normal zoom lenses will be main workhorse and will cover up to 80% of the total shots.

This was a wedding I did about 9 months ago. It was only for 1 session, the groom's reception.

This image is the typical classic couple wedding shot. With the E-3, Zuiko Digital 14-54mm f2.8-3.5 and FL-50R. The focal length was 54mm with aperture of f/3.5 and shutter speed of 1/100s. The sensitivity was set to ISO400.


E-3 with Zuiko Digital 14-54mm f2.8-3.5 and FL-50R
23mm, f/5.0, 1/25s, ISO400, -0.3EV

Another important aspect of wedding photography is the post-processing workflow. Typical album is a 22-page 8RW layout, with an assortment of photos up to 150 shots!! It is up to the photographer to finalize the layout. And the amount of work is double the photo shoot job!! So, be prepared!!!!

Sunday, January 25, 2009

Zuiko and Kids in Pool

Shooting in strong sunlight is a bit tough without a flash. Backlighting is a killer.

It was morning around 10am, and the kids were playing in the kiddy pool. Sunlight was about 45 degrees up, and posed difficult for me to get the shots right.

Enter the FP Flash using the FL-50R.

Using E-3 with the Zuiko Digital ED14-35mm F2.0 SWD, I had no fear shooting up close with the splashes! Both were weather-sealed.

The main picture was captured at 31mm with the aperture at F2.0 for shallow depth-of-field. My daughter was sharp, my son was blur. Shutter speed was 1/1250s with ISO100 and +0.3EV compensation. Fill-flash by the FL-50R ensured the my children were not shadowed by the backlight. With FP turned on, I was able to shoot wide open.

Auto White Balance was accurate, color was Natural with all settings at default. Straight out of camera JPEG, the E-3 is the best in the league!

My post-process was done in Olympus Studio v2.22, with only USM at 120%, 1.2, 0 and resized to 2736 x 2052 pixels.


The rest of the images. For a complete slideshow, click HERE.

Wednesday, January 21, 2009

E-30: Shooting Low and Clean

I put my camera low under the flower shrubs, with the FL-50R on the right side low. I flipped out the LCD, snapped up the on-camera flash, angled the lens sky ward, framed the shot while adjusting the LCD view... CLICK... KERRR-CHAAK!

Voila!!


E-30, Zuiko Digital 14-54mm
27mm, F6.3, 1/320s, ISO200, ESP Metering
Remote flash setting: RC (Ch1, Lo), A (FP TTL, -2.0), B (OFF), C (OFF)


Here is how....

One of the cute features of E-30 is the flippable screen a-la camcorders. I love it, very much!!!

It enables me to take some nice angles. Fantastic!!!!

Also, notice that all 11 nicely-spaced focus points are usable. With the help of the nifty little histogram graph on the bottom left, getting the right exposure is like having a walk in the park.

For this shot, I cradled the E-30 just above ground pointing upwards, just next on the left side of the FL-50R flash.

*Note: The tripod was not used during this shooting because it was not low enough. It was meant for demonstration of the LCD screen.


As for the flash setting, I shot at full FP TTL setting. This enabled high shutter speed up to 1/8000s for flash shooting. Cool!! (By the way, Olympus invented this capability with the OM-4Ti and F-280 flash back in the 80's).

Since the morning sun filled the top part of the flower, I only needed a single flash to illuminate the dark shadowy parts.

Everything was TTL. So easy! Boy, I love simple automation! Gone are the days of Auto or Manual mode flash.

The flower was graciously captured whithout having any of my body parts dirty and aching (definitely avoided doing some contortion stuff).


Another thing, did I tell you that the 14-54mm can focus up close to 22cm, enabling up to 1:4 magnification (if we are talking in FF terms, this is 1:2). Awesome!!!

Saturday, November 8, 2008

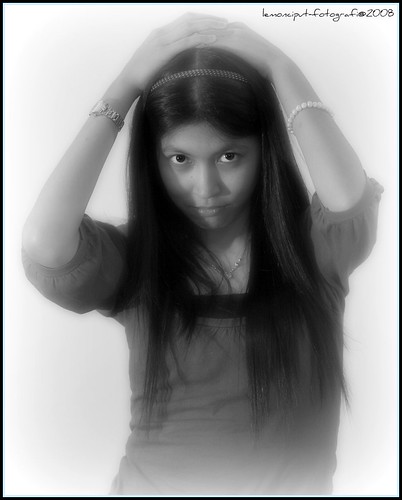
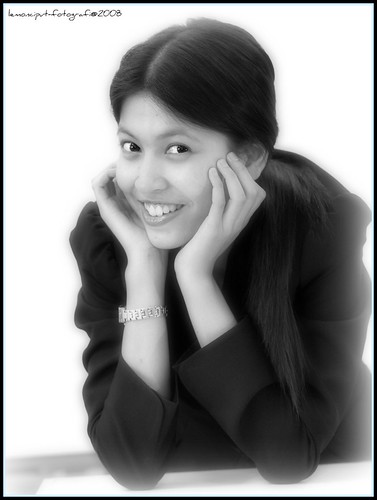
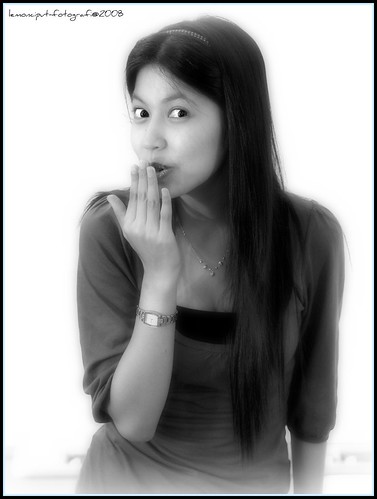
Zuiko and Facial/Body Expressions

I was asked by my friend, who was commissioned by our HR Dept. to create a video for our new hirings. My friend, whilst in charge of producing the video, had asked my help to set up a photo shoot for portraiture. The goal was to capture facial expressions that will make up part of the vidoe clip.


With the spirit of using everything in-house, my friend got hold of a staff who was keen to be the model of the shoot. She was able to illustrate what my friend had in mind, and the shoot was all done within 2 hours.


The make-shift studio was simple. We went to the HR training center, and used one of the presentation rooms. The white background was actually a "typical" white board, and to my delight, the surface was matte! What this meant was that my flash setup will be just perfect, without the worry of distracting reflections from the background.


Within minutes, I had setup the location shoot with the E-3 as the main camera, with the Zuiko ED35-100mm F2.0 lens. For the lighting, I used 2 E-system flashes; FL-50R on my left and FL-36R on my right. And I also switched on all the ambient lighting available in the room. There were also windows along the room to my right to allow some sunlight to irradiate into the room.


For the shoot, it was a team effort. My friend directed what he wanted the model to do, and all I did was to capture the facial and body expressions instanteneously. The E-system was up to the task, as I was able to setup continuous shooting with both flash. I set it to the E-3 maximum, which was 5 frames-per-second.


*** A little technical here ***

I set the E-3 to High ISO about 640, with 5FPS continuous shooting. Camera setting was at Manual Mode, with the Aperture at F2.8 and shutter speed at 1/125s. As for the ED35-100mm F2.0 lens, I set the Focus Limiter to 1.4m-3m setting to ensure minimal focus-refocus on the lens.
For the creative lighting, I programmed the on-board flash commander to communicate at full TTL with both flash using different channels. This was ensure the communication for each flash is independent.
For the main flash on my left, FL-50R, I set on Channel 1A with TTL -2.7EV. For the fill-flashon my right, FL-36R, I set on Channel 1B with TTL -1.7EV. Both these flashes were at about 6-10 distance to the model. Both flash head was pointed up 30 degree to ensure the ample illumination from the model's head to stomach.

***